Crispy Spring Rolls are the ultimate crowd-pleasing appetizer that combines a golden, crunchy wrapper with a savory, flavorful filling. Whether you’re planning a family dinner, hosting a party, or simply craving a takeout-style snack at home, these Crispy Spring Rolls deliver irresistible texture and taste. Packed with seasoned chicken and fresh vegetables, then fried to perfection, they offer the perfect balance between crunch and juicy filling. The best part is that you can easily customize them to suit your preferences while still achieving that signature crisp bite everyone loves.
If you’ve ever wondered how to make restaurant-quality Crispy Spring Rolls in your own kitchen, this detailed guide will walk you through every step, from selecting ingredients to achieving that golden brown finish.
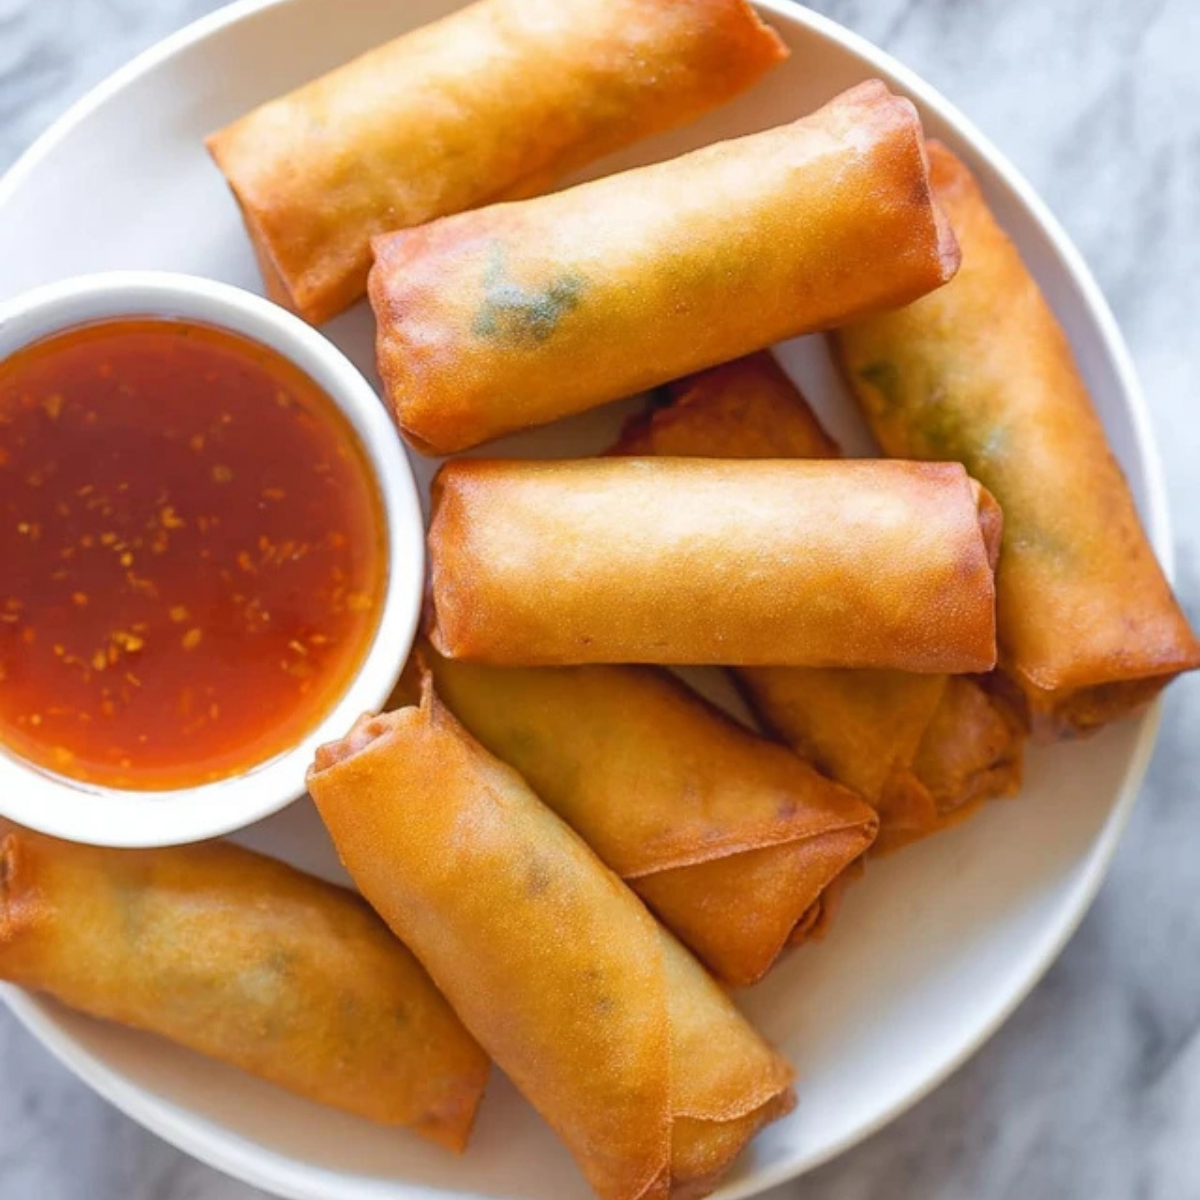
Table of Contents
Why You’ll Love These Crispy Spring Rolls
There are many reasons why Crispy Spring Rolls remain a favorite in Asian-inspired cuisine. First, they are incredibly versatile. You can serve them as an appetizer, snack, or even a light meal alongside a fresh salad or dipping sauce.
Another reason these Crispy Spring Rolls stand out is their texture. The contrast between the crunchy exterior and the tender, well-seasoned chicken filling creates a satisfying bite every time. They are also ideal for meal prep, as you can assemble them in advance and fry them just before serving.
Homemade Crispy Spring Rolls are fresher than takeout and allow you to control the ingredients. This means less grease, balanced seasoning, and the option to bake or air-fry if you prefer a lighter version. Plus, they freeze beautifully, making them convenient for busy weeknights.
Ingredients for the Perfect Crispy Spring Rolls
• Spring roll wrappers: Thin pastry sheets that fry into a light, crunchy shell.
• Ground chicken: Provides a juicy and flavorful protein base for the filling.
• Green cabbage: Adds subtle sweetness and a slight crunch to balance the meat.
• Carrots: Bring color, texture, and natural sweetness.
• Garlic: Infuses the filling with deep, aromatic flavor.
• Green onions: Add freshness and a mild onion note.
• Soy sauce: Enhances umami and seasons the mixture evenly.
• Oyster sauce: Contributes depth and savory richness.
• Sesame oil: Adds a nutty aroma typical of Asian dishes.
• Salt and black pepper: Balance and highlight all flavors.
• Cornstarch slurry or beaten egg: Seals the edges of the rolls securely.
• Neutral oil for frying: Ensures even cooking and that signature golden crisp.
Ingredient Swaps and Variations for Crispy Spring Rolls
If you don’t have ground chicken, you can substitute ground turkey, pork, or even shrimp for equally delicious Crispy Spring Rolls. For a vegetarian version, replace the meat with finely chopped mushrooms, tofu, or a mixture of shredded vegetables.
To make gluten-free Crispy Spring Rolls, use gluten-free wrappers and tamari instead of soy sauce. You can also experiment with additional ingredients like bean sprouts, water chestnuts, or finely shredded bell peppers for extra crunch and flavor.
Step-by-Step Guide to Making Crispy Spring Rolls
- Prepare the filling by heating a small amount of oil in a skillet over medium heat. Add the ground chicken and cook until no longer pink, breaking it up with a spoon. Stir in garlic, cabbage, carrots, and green onions. Cook until the vegetables soften slightly but still retain some texture.
- Season the mixture with soy sauce, oyster sauce, sesame oil, salt, and pepper. Stir well to combine. Remove from heat and allow the filling to cool completely before assembling the Crispy Spring Rolls. Cooling prevents the wrappers from becoming soggy.
- Lay a spring roll wrapper on a clean surface in a diamond shape. Spoon a small portion of the filling near the bottom corner. Avoid overfilling, as this can cause the rolls to burst during frying.
- Fold the bottom corner over the filling, tuck it in tightly, then fold in the side corners. Roll upward firmly to form a tight cylinder. Brush the top corner with cornstarch slurry or beaten egg to seal. Repeat with remaining wrappers and filling.
- Heat neutral oil in a deep pan to about 350°F (175°C). Carefully add a few Crispy Spring Rolls at a time without overcrowding the pan. Fry for 3 to 5 minutes, turning occasionally, until golden brown and crisp.
- Remove the Crispy Spring Rolls with a slotted spoon and place them on a wire rack or paper towels to drain excess oil. Let them cool slightly before serving to allow the filling to set.
For extra crunch, you can double-fry the spring rolls by frying them once at a slightly lower temperature, letting them rest, and then frying again briefly at a higher temperature.
Tips for Extra Crispy Spring Rolls
To ensure your Crispy Spring Rolls stay crunchy, always keep the wrappers covered with a damp towel while assembling. This prevents them from drying out and cracking.
Avoid adding too much moisture to the filling. If the vegetables release excess liquid, cook it off before cooling. A dry filling helps maintain the structural integrity of the rolls.
Maintain consistent oil temperature when frying. If the oil is too hot, the outside will brown too quickly while the inside remains undercooked. If it’s too cool, the rolls may absorb excess oil and become greasy instead of crispy.
For storing leftovers, allow the Crispy Spring Rolls to cool completely before refrigerating in an airtight container. Reheat in an oven or air fryer to restore their crunch rather than microwaving.
Serving Suggestions and Flavor Variations
Crispy Spring Rolls pair beautifully with dipping sauces like sweet chili sauce, soy-ginger dip, or a tangy rice vinegar sauce. For a spicy twist, add chili garlic sauce or crushed red pepper flakes to the filling.
Serve these Crispy Spring Rolls alongside fried rice, stir-fried noodles, or a light cucumber salad for a complete meal. They also make an excellent addition to party platters with dumplings and potstickers.
If you prefer a lighter version, you can bake the spring rolls at 400°F (200°C) until golden, brushing them lightly with oil beforehand. An air fryer also works well, producing Crispy Spring Rolls with significantly less oil while maintaining a satisfying crunch.
For make-ahead convenience, assemble the rolls and freeze them in a single layer. Once frozen, transfer to a freezer bag. Fry directly from frozen, adding a couple of extra minutes to the cooking time.
Are Crispy Spring Rolls Healthy?
While traditionally fried, Crispy Spring Rolls can fit into a balanced diet when enjoyed in moderation. Using lean ground chicken and plenty of vegetables boosts the nutritional value with protein, fiber, and essential vitamins.
Baking or air frying significantly reduces oil content while preserving the crunch. You can also increase the vegetable ratio in the filling to create lighter Crispy Spring Rolls that are still full of flavor.
Because they are portion-controlled and individually wrapped, it’s easy to manage serving sizes. Pairing them with a fresh salad or steamed vegetables creates a well-rounded meal.
Final Thoughts on Making Crispy Spring Rolls at Home
Making Crispy Spring Rolls from scratch may seem intimidating at first, but once you master the rolling technique and frying temperature, it becomes a simple and rewarding process. The combination of crunchy wrapper and savory chicken filling makes these rolls a timeless favorite.
By following these steps and tips, you’ll achieve perfectly golden Crispy Spring Rolls every time. Whether served as a snack, appetizer, or main dish, they bring restaurant-quality flavor right to your table with the added satisfaction of homemade freshness.
Conclusion: Mastering Crispy Spring Rolls at Home
Crispy Spring Rolls are more than just a popular appetizer — they’re a celebration of texture, flavor, and homemade comfort. With their golden, crackly exterior and savory chicken and vegetable filling, these rolls bring restaurant-quality results straight to your kitchen. By carefully preparing the filling, rolling them tightly, and frying at the right temperature, you can consistently achieve perfectly Crispy Spring Rolls that rival your favorite takeout spot.
The beauty of Crispy Spring Rolls lies in their versatility. You can customize the filling, adjust the seasoning, bake or air fry for a lighter option, and even freeze them for later. Whether you’re serving them at a gathering, preparing a family dinner, or stocking your freezer with ready-to-cook snacks, this recipe ensures dependable, crunchy results every time.
Once you’ve made homemade Crispy Spring Rolls from scratch, you’ll appreciate the fresh ingredients, balanced flavors, and irresistible crunch even more. With a little practice, they’ll quickly become a staple in your kitchen.
Frequently Asked Questions About Crispy Spring Rolls
How do I keep Crispy Spring Rolls from getting soggy?
To keep Crispy Spring Rolls crunchy, make sure the filling is completely cooled before rolling. Excess moisture is the main cause of sogginess. Cook off any liquid released by vegetables and avoid overfilling the wrappers. After frying, place the rolls on a wire rack instead of stacking them on paper towels to prevent trapped steam from softening the crust.
Can I bake or air fry Crispy Spring Rolls instead of deep frying?
Yes, you can bake or air fry Crispy Spring Rolls for a lighter alternative. Brush them lightly with oil and bake at 400°F (200°C) until golden and crisp, turning halfway through. In an air fryer, cook at 375°F (190°C) for about 10–15 minutes. While deep frying gives the most traditional crunch, these methods still produce deliciously crispy results.
Can I freeze Crispy Spring Rolls before cooking?
Absolutely. Crispy Spring Rolls freeze very well. Arrange the uncooked rolls in a single layer on a baking sheet and freeze until solid. Then transfer them to a freezer-safe bag. Fry directly from frozen, adding a few extra minutes to the cooking time. This makes them perfect for meal prep and quick appetizers.
More Relevant Recipes
Print
Crispy Spring Rolls
- Prep Time: 25 minutes
- Cook Time: 20 minutes
- Total Time: 45 minutes
- Yield: 20 spring rolls 1x
- Category: Appetizer
- Method: Deep Frying
- Cuisine: Asian
- Diet: Halal
Description
Crispy Spring Rolls filled with seasoned ground chicken, cabbage, carrots, and aromatics, wrapped in thin pastry and fried to golden perfection. These homemade spring rolls are crunchy on the outside, juicy on the inside, and perfect as an appetizer, snack, or party favorite.
Ingredients
- 20 spring roll wrappers
- 1 lb (450g) ground chicken
- 2 cups finely shredded green cabbage
- 1 cup grated carrots
- 3 cloves garlic, minced
- 3 green onions, finely sliced
- 2 tablespoons soy sauce
- 1 tablespoon oyster sauce
- 1 teaspoon sesame oil
- 1/2 teaspoon salt
- 1/2 teaspoon black pepper
- 1 tablespoon cornstarch mixed with 2 tablespoons water (for sealing)
- 3–4 cups neutral oil for frying
Instructions
- Heat 1 tablespoon of oil in a large skillet over medium heat. Add the ground chicken and cook until no longer pink, breaking it apart as it cooks.
- Stir in the minced garlic, shredded cabbage, grated carrots, and green onions. Cook for 3–4 minutes until slightly softened but not mushy.
- Add soy sauce, oyster sauce, sesame oil, salt, and black pepper. Stir well to combine and cook for another 1–2 minutes. Remove from heat and allow the filling to cool completely.
- Place a spring roll wrapper on a clean surface in a diamond position. Spoon about 2 tablespoons of filling near the bottom corner.
- Fold the bottom corner over the filling, fold in both sides tightly, and roll upward into a firm cylinder. Seal the top corner with the cornstarch slurry. Repeat with remaining wrappers.
- Heat neutral oil in a deep pan to 350°F (175°C). Fry the spring rolls in batches for 3–5 minutes, turning occasionally, until golden brown and crispy.
- Remove and drain on a wire rack or paper towels. Let cool slightly before serving with your favorite dipping sauce.
Notes
- Ensure the filling is fully cooled before wrapping to prevent soggy wrappers.
- Do not overcrowd the pan while frying to maintain oil temperature.
- For extra crunch, double fry the spring rolls for 1–2 minutes after the first fry.
- Uncooked spring rolls can be frozen and fried directly from frozen; just add a few extra minutes to the cooking time.
- Bake at 400°F (200°C) for 18–22 minutes or air fry at 375°F (190°C) for a lighter version.
Nutrition
- Serving Size: 1 spring roll
- Calories: 150
- Sugar: 1g
- Sodium: 220mg
- Fat: 8g
- Saturated Fat: 2g
- Unsaturated Fat: 5g
- Trans Fat: 0g
- Carbohydrates: 12g
- Fiber: 1g
- Protein: 7g
- Cholesterol: 20mg