These Red Velvet Bear Cookies are soft, subtly sweet, and impossibly cute — the perfect treat for Valentine’s Day, winter holidays, or whenever you’re craving a fun baking project. With their signature red hue and chocolate-decorated bear faces, these cookies bring a playful twist to classic red velvet. They’re not only delicious but also family-friendly and customizable for various diets, making them a hit with kids and adults alike.
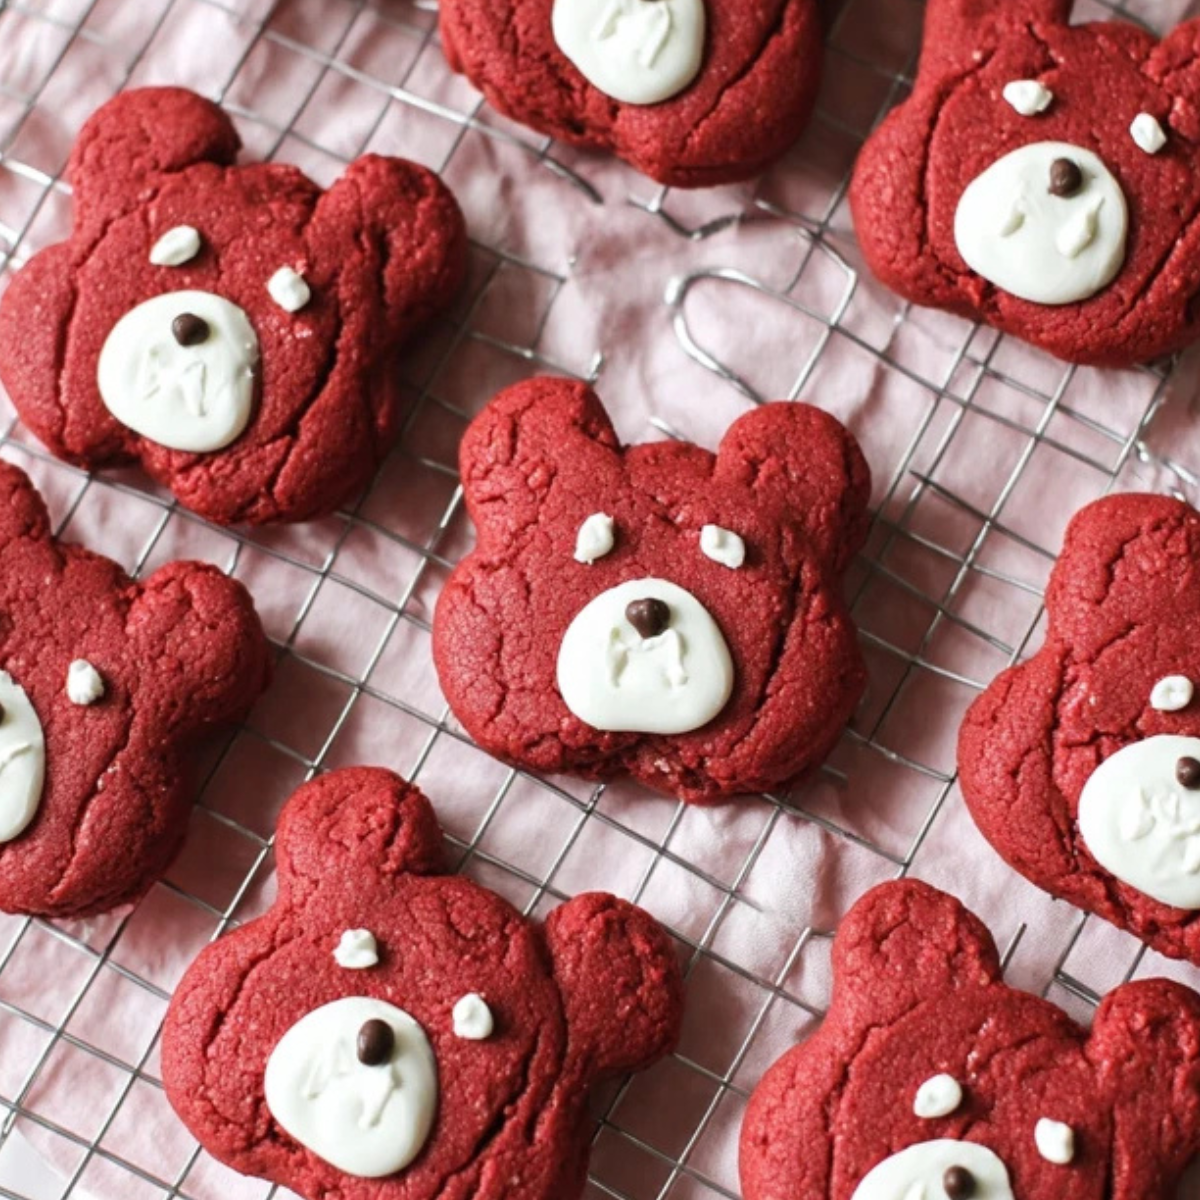
Table of Contents
Why You’ll Love These Red Velvet Bear Cookies
These cookies are more than just a pretty face. Their soft, chewy texture combined with a balanced sweetness makes them ideal for those who prefer less sugary treats. The addition of cocoa gives them a gentle chocolatey depth, while the red coloring and bear shapes make them festive and fun. Whether you’re baking with kids or preparing a special gift, these red velvet bear cookies are guaranteed to impress.
What You’ll Need for Red Velvet Bear Cookies
• All-Purpose Flour: Provides the structure for the cookies.
• Cocoa Powder: Adds a light chocolate flavor and enhances the classic red velvet taste.
• Baking Soda & Baking Powder: Helps the cookies rise slightly and maintain a soft texture.
• Salt: Balances sweetness and deepens flavor.
• Unsalted Butter: Adds richness and helps create a tender crumb.
• Granulated Sugar: Sweetens and contributes to the cookie’s texture.
• Light or Dark Brown Sugar: Adds moisture and a hint of caramel flavor.
• Vanilla Extract: Enhances all other flavors.
• White Vinegar: Helps preserve the vibrant red color and adds slight acidity for lift.
• Egg: Binds the dough and adds structure.
• Red Food Coloring: Essential for the iconic red velvet color.
• Milk or Dark Chocolate (Melted): Used for eyes and nose decoration.
• White Chocolate (Melted): For snouts and ears, later dyed for blush.
• Oil-Based Food Coloring: Used to dye chocolate for blush detail without causing it to seize.
Ingredient Swaps and Vegan Alternatives
If you’re vegan or out of a few ingredients, here are some great alternatives:
• Vegan Butter: Use high-quality vegan butter like Miyoko’s or Country Crock to replace dairy butter.
• Egg Replacement: Skip the egg and adjust the dough texture by adding 2–4 tbsp of non-dairy milk as needed.
• Vegan Chocolate: Brands like Pascha make excellent dairy-free options. You can also use a simple icing recipe in place of melted chocolate.
• Food Coloring: Make sure to use oil-based coloring for chocolate or add a bit of neutral oil to avoid clumping.
How to Make Red Velvet Bear Cookies – Step by Step
- Combine Dry Ingredients: In a bowl, whisk together flour, cocoa powder, baking soda, baking powder, and salt.
- Mix Wet Ingredients: Using a mixer or whisk, combine melted butter, granulated sugar, and brown sugar until smooth. Add vanilla extract, vinegar, egg, and red food coloring.
- Form the Dough: Gradually add dry ingredients to the wet mixture, stirring until a thick dough forms. Adjust red coloring if needed.
- Chill the Dough: Cover and refrigerate for 20–30 minutes to firm up the dough, making it easier to shape and bake.
- Preheat Oven: Set to 325°F (163°C) and line two baking trays with parchment paper or silicone mats.
- Shape the Bears: Scoop 1½ tablespoons of dough per cookie and roll into balls. For ears, take about 1 teaspoon of dough, divide it in two, and attach as small balls on top.
- Bake: Place cookies 3 inches apart and bake for 9–11 minutes. Edges should be set, centers slightly puffy. Let cool on the pan for 5–10 minutes, then transfer to a wire rack.
- Decorate the Faces:
- Use melted white chocolate to add snouts and inner ears.
- Use dark or milk chocolate for the eyes and nose.
- Tint remaining white chocolate pink or red for blush using oil-based coloring or a touch of neutral oil.
- Let Set and Store: Allow decorated cookies to cool completely. Store in an airtight container at room temperature for up to 1 week.
Pro Tips for Perfect Red Velvet Bear Cookies
• Weigh Your Flour: For accuracy, use a kitchen scale. If using cups, gently spoon and level to avoid dense cookies.
• Don’t Skip Chilling: Cold dough is easier to shape and results in chewier cookies.
• Mind the Chocolate: Only use oil-based coloring for melted chocolate or stir in neutral oil if it seizes.
• Underdone = Chewier: Slightly underbaking will give you extra chewy cookies once they cool.
Fun Pairings & Creative Variations
• Pair With: Hot cocoa, cream cheese dip, or a glass of milk for a cozy treat.
• Holiday Twist: Add peppermint extract or holiday sprinkles to the dough.
• Make Ahead: Freeze the shaped dough and bake when needed.
• Gluten-Free Option: Substitute with a 1:1 gluten-free baking flour blend.
• Add a Filling: Stuff with a small piece of chocolate or cream cheese frosting for a surprise center.
Why Red Velvet Bear Cookies Are Perfect Year-Round
These red velvet bear cookies may scream Valentine’s Day, but they’re versatile enough for any occasion. Their soft texture, customizable flavors, and playful design make them a hit at birthdays, baby showers, school events, and beyond. Plus, the recipe is adaptable — whether you need it vegan, less sweet, or extra chocolatey, it works. So no matter the season, this cookie will earn a spot in your regular baking rotation.
Conclusion
Whether you’re baking for Valentine’s Day, a cozy winter weekend, or just craving a fun and unique treat, Red Velvet Bear Cookies are the perfect choice. They’re soft, lightly sweet, and visually irresistible with their charming bear shapes and chocolate faces. This recipe strikes the perfect balance between festive and family-friendly, and thanks to its flexible ingredient options, it’s easy to adapt for various dietary needs. Once you try them, you’ll want to make these cookies a permanent part of your holiday traditions — or any time you’re in the mood for something cute and delicious.
Frequently Asked Questions About Red Velvet Bear Cookies
Can I freeze the dough for later use?
Yes, you can freeze the cookie dough for up to 2 months. Shape the bears first (including the ears), then freeze on a baking sheet. Once frozen, transfer them to a freezer-safe bag or container. Bake directly from frozen, adding 1–2 minutes to the baking time.
How do I prevent the chocolate from seizing when coloring it?
Chocolate seizes when water-based food coloring is added. Use oil-based food coloring for best results. If your chocolate does seize, stir in 1 teaspoon of neutral oil (like canola or vegetable oil) at a time until it smooths out again.
Can I make these cookies without red food coloring?
Yes. While red food coloring gives the cookies their classic red velvet look, you can skip it for a more natural cocoa-brown cookie. The taste will still be delicious, just minus the signature red hue.
Are these cookies suitable for kids to help make?
Absolutely! Kids will love shaping the bear faces and helping decorate with melted chocolate. Just supervise when working with hot chocolate or the oven. It’s a fun and creative activity that the whole family can enjoy.
More Relevant Recipes
- Chocolate Peanut Butter Valentine’s Heart – Perfect for Valentine’s Day
- Mandarin Orange Cake – Light & Delicious Dessert
- Red Velvet Cream Cheese Bundt Cake – Perfect for Any Occasion

Red Velvet Bear Cookies
- Prep Time: 20 minutes
- Cook Time: 11 minutes
- Total Time: 1 hour 1 minute
- Yield: 16 cookies 1x
- Category: Dessert
- Method: Baking
- Cuisine: American
- Diet: Vegetarian
Description
Red Velvet Bear Cookies are soft, not-too-sweet treats decorated with melted chocolate to resemble adorable teddy bears. Perfect for holidays, especially Valentine’s Day, these cookies combine red velvet flavor with creative, fun decorating. Vegan-friendly alternatives included.
Ingredients
- 1 ½ cups (180g) all-purpose flour
- 2 tbsp (14g) cocoa powder, sifted
- ½ tsp (2g) baking soda
- ½ tsp (2g) baking powder
- ½ tsp (3g) salt
- ½ cup (113.5g) unsalted butter, melted and cooled
- ¼ cup (50g) granulated sugar
- ¼ cup (55g) light or dark brown sugar, packed
- 1 tsp (4g) vanilla extract
- 1 tsp (5g) white vinegar
- 1 large egg
- Red food coloring (as needed)
- 1 tbsp (15g) melted milk or dark chocolate (for face details)
- 3 tbsp (44.36g) melted white chocolate (for ears and snout)
- Oil-based food coloring (for pink/red blush)
Instructions
- In a medium bowl, whisk together flour, cocoa powder, baking powder, baking soda, and salt.
- In a mixing bowl, combine melted butter, granulated sugar, and brown sugar. Mix until smooth.
- Add vanilla extract, vinegar, egg, and red food coloring. Stir until well combined.
- Slowly add the dry ingredients into the wet mixture and stir until a thick dough forms.
- Cover the dough with plastic wrap and refrigerate for 20–30 minutes.
- Preheat the oven to 325°F (163°C) and line two baking trays with parchment paper or silicone mats.
- Use a small cookie scoop (1½ tbsp) to portion the dough into balls. Place on trays, 3 inches apart.
- Form ears using about 1 tsp of dough, split in half, and shape into two small balls. Attach to the tops of each cookie ball.
- Bake for 9–11 minutes until edges are set and centers are slightly puffy.
- Let cookies cool on the tray for 5–10 minutes, then transfer to a wire rack to cool completely.
- Decorate cooled cookies: use melted white chocolate to create snouts and ears.
- Dye leftover white chocolate pink or red with oil-based coloring and add blush with a toothpick or piping bag.
- Use melted dark or milk chocolate to draw eyes and noses. Allow the decorations to set.
Notes
- Chill dough for better shape and chewy texture.
- Use oil-based food coloring to avoid seizing chocolate when coloring blush.
- For vegan version: replace butter with high-quality vegan butter, omit egg, and use vegan chocolate or icing.
- Store cookies in an airtight container at room temperature for up to a week.
- Spoon and level flour properly or use a scale for accuracy.
Nutrition
- Serving Size: 1 cookie
- Calories: 145
- Sugar: 9g
- Sodium: 129mg
- Fat: 7g
- Saturated Fat: 5g
- Unsaturated Fat: 2.3g
- Trans Fat: 0.2g
- Carbohydrates: 18g
- Fiber: 1g
- Protein: 2g
- Cholesterol: 26mg