Introduction
Red Velvet Cake Pops are irresistible bite-sized desserts that combine the classic velvety flavor of red velvet cake with the fun presentation of cake pops. These Red Velvet Cake Pops are rich, moist, and dipped in a smooth chocolate or candy coating, creating a dessert perfect for parties, holidays, or any celebration where you want a stunning sweet treat. With a creamy cream cheese center and vibrant red crumb encased in a glossy shell, these cake pops deliver indulgence in every bite and are easy enough for home bakers of all levels to master.
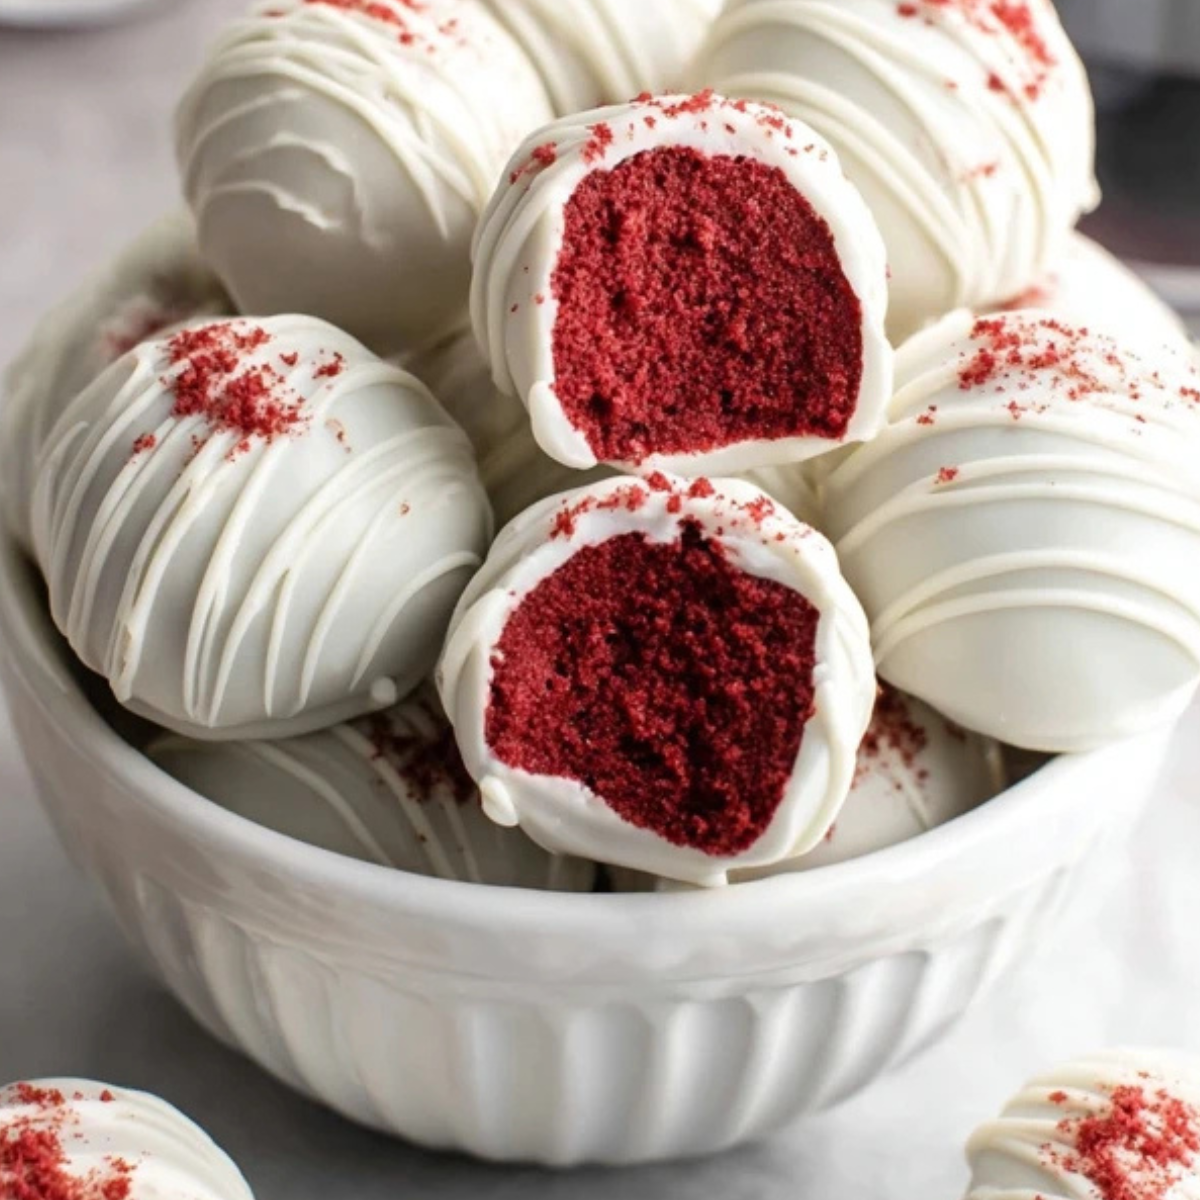
Table of Contents
Why You’ll Love These Red Velvet Cake Pops
Red Velvet Cake Pops stand out for their bold red color, tender texture, and classic cream cheese cake flavor that’s nostalgic yet festive. Whether you’re making them for Valentine’s Day, Christmas, or a birthday party, these cake pop treats are crowd-pleasers that feel special without requiring advanced baking skills. Unlike large cakes, Red Velvet Cake Pops offer convenient single-bite portions, making them perfect for sharing, gifting, or pairing with coffee or tea.
What Makes Red Velvet Cake Pops So Special
The magic behind Red Velvet Cake Pops comes from the combination of moist red velvet cake crumbs and creamy frosting that binds the mixture into perfect little balls. When dipped in a sweet white chocolate or candy coating, they transform into elegant, glossy dessert bites that are as beautiful as they are delicious. Layer in decorative sprinkles, contrasting chocolate drizzles, or colored candy melts to match any party theme or holiday palette.
Ingredients for Red Velvet Cake Pops
• Red Velvet Cake Crumbs: The foundation of the cake pop, providing the signature red color and tender crumb; can be made with a scratch recipe or boxed mix.
• Cream Cheese Frosting: Acts as the glue to bind the cake crumbs together and adds classic tangy flavor.
• White Chocolate or Candy Coating: For dipping the cake pops; creates a smooth, firm outer shell that contrasts beautifully with the soft interior.
• Cake Pop Sticks: Essential for the traditional cake pop presentation and easy handling.
• Sprinkles or Decorations: Optional but adds personality, color, and texture to finished pops.
Alternative Ingredient Suggestions for Dietary Needs
If you’re catering to dietary preferences or ingredient shortages, consider these helpful swaps while still keeping the essence of Red Velvet Cake Pops intact:
• Gluten-Free Cake Mix: Swap the standard cake mix for a gluten-free version; ensure the mix is labeled gluten-free to maintain texture.
• Vegan Cream Cheese Frosting: Use plant-based cream cheese frosting to make the recipe dairy-free while preserving the tangy balance.
• Dark Chocolate Coating: Substitute white candy melts with dark chocolate for a deeper flavor contrast that still complements the red velvet base.
Step-by-Step Instructions to Make Red Velvet Cake Pops
- Bake the Red Velvet Cake: Preheat oven according to your chosen red velvet cake recipe. Prepare the cake batter using a box mix or from scratch with buttermilk, cocoa, and red food coloring for authentic flavor. Bake in a 9×13-inch pan until a toothpick inserted in the center comes out clean. Let cool completely before moving to the next step.
- Crumble the Cake: Once the cake is fully cooled, crumble it into fine crumbs using your hands or a fork in a large mixing bowl. Smaller crumbs make smoother cake pops.
- Add Cream Cheese Frosting: Add cream cheese frosting to the cake crumbs, beginning with a small amount and mixing until the mixture holds together when pressed. It should be firm but pliable.
- Form Cake Balls: Roll the cake and frosting mixture into 1-inch balls. Place them on a parchment-lined baking sheet. Chill in the refrigerator for at least 30 minutes so they firm up and are easier to coat.
- Insert Sticks: Melt a small amount of candy coating and dip the tip of each cake pop stick into the coating. Insert the stick halfway into each chilled cake ball; this helps secure the sticks. Chill again briefly.
- Dip in Coating: Melt the white chocolate or candy melts according to package instructions. Dip each cake pop into the melted coating, ensuring even coverage. Let the excess drip off before placing upright in a stand or styrofoam to set.
- Decorate and Set: While the coating is still wet, add sprinkles or drizzle a contrasting color for decoration. Allow the Red Velvet Cake Pops to set completely at room temperature or in the fridge.
Tips & Tricks for Perfect Red Velvet Cake Pops
• Cool the Cake Completely: Warm cake will make the frosting melt into the crumbs and result in a mixture that’s too soft to shape properly.
• Keep Balls Firm: Chilling the cake balls before dipping helps them hold their shape and prevents them from falling off sticks during coating.
• Use Candy Melts: Candy melts are formulated to give a smooth shell that sets firm without tempering, making dipping easier for beginners.
• Prevent Cracking: Let the coating cool slightly before dipping to avoid cracking caused by extreme temperature differences.
• Store Properly: Place finished cake pops in an airtight container; they keep well for several days at room temperature or longer in the fridge.
Pairing Ideas and Variations for Red Velvet Cake Pops
Red Velvet Cake Pops pair wonderfully with drinks and desserts that balance their sweetness:
• Beverage Pairings: Serve alongside coffee, spiced chai, or a cold glass of milk to balance the rich cream cheese and chocolate coating.
• Flavor Variations: Add a hint of cinnamon or espresso powder to the cake crumb mix for subtle flavor complexity.
• Decorative Themes: For Valentine’s Day, use heart-shaped sprinkles or red and pink drizzles; for Christmas, incorporate green candy melts or festive sugar.
• Cake Pop Alternatives: Shape the mixture into mini “cake balls” without sticks for truffle-style desserts perfect for bite-sized serving trays.
Seasonal & Festive Serving Ideas
Red Velvet Cake Pops are ideal for celebrations year-round. In winter, accent the white chocolate coating with red and green sprinkles for an elegant holiday dessert table. Around Valentine’s Day, the rich red hue speaks to the theme of love and indulgence, making these cake pops perfect for gifting in decorative boxes or clear bags tied with ribbons. In spring and summer, bright pastel candy melts can give a fresh twist while preserving that classic red velvet flavor.
Storage and Make-Ahead Tips
• Refrigerator: Store finished Red Velvet Cake Pops in an airtight container for up to one week.
• Freezer: Wrap individually and freeze up to 2–3 months. Thaw in the fridge before serving.
• Make Ahead: Prepare cake balls a day ahead and keep them chilled; dip and decorate on the day you plan to serve for optimum freshness.
Conclusion
Red Velvet Cake Pops are the kind of dessert that instantly elevates any table. With their rich red velvet flavor, soft and creamy center, and smooth candy coating, they offer everything people love about classic red velvet cake in a perfectly portioned, mess-free bite. Whether you’re preparing them for a party, a holiday dessert spread, or simply to keep in the fridge for sweet cravings, Red Velvet Cake Pops are easy to customize, fun to decorate, and always impressive. Once you make them at home, you’ll see how simple it is to turn a humble cake into a show-stopping treat that looks bakery-made but tastes even better.
Frequently Asked Questions About Red Velvet Cake Pops
Can I make Red Velvet Cake Pops without cake pop sticks?
Yes, absolutely. You can shape the mixture into small balls and serve them as red velvet cake truffles instead. Simply skip the sticks, dip the balls in melted chocolate, and place them on parchment paper to set. They deliver the same flavor and texture as Red Velvet Cake Pops, just without the handheld presentation.
Why are my Red Velvet Cake Pops cracking after dipping?
Cracking usually happens when the cake balls are too cold and the coating is too warm. The sudden temperature difference causes the shell to expand and split. Let the coating cool slightly before dipping, and allow the cake balls to sit at room temperature for a few minutes after chilling. This small step helps Red Velvet Cake Pops set smoothly with a flawless finish.
How far in advance can I prepare Red Velvet Cake Pops?
You can prepare Red Velvet Cake Pops several days ahead. Finished cake pops keep well in an airtight container in the refrigerator for up to one week. You can also freeze the undecorated cake balls for a few months, then thaw, dip, and decorate them when you’re ready to serve.
What is the best coating for Red Velvet Cake Pops?
Candy melts are the most beginner-friendly option because they melt smoothly and set firm without tempering. White chocolate is also popular for Red Velvet Cake Pops because it highlights the red interior and offers a sweet, creamy contrast. Dark or milk chocolate work just as well if you prefer a richer flavor.
More Relevant Recipes
- Banana Bars with Cream Cheese Frosting – Easy & Delicious
- S’mores Energy Bites – No-Bake Protein Snack
- Bang Bang Shrimp – Best Crispy Appetizer Recipe
Red Velvet Cake Pops
- Prep Time: 30 minutes
- Cook Time: 30 minutes
- Total Time: 1 hour
- Yield: 24 cake pops 1x
- Category: Dessert
- Method: No-bake (after cake preparation)
- Cuisine: American
- Diet: Vegetarian
Description
These Red Velvet Cake Pops are rich, moist, and bite-sized treats made from tender red velvet cake crumbs blended with cream cheese frosting, then dipped in a smooth white chocolate coating. Perfect for parties, holidays, or gifting, they deliver classic red velvet flavor in a fun, elegant presentation.
Ingredients
- 1 baked 9×13-inch red velvet cake, cooled and crumbled
- 3/4 cup cream cheese frosting
- 12 oz white chocolate or candy melts
- 1 tbsp vegetable oil or coconut oil (for thinning coating, optional)
- 24 cake pop sticks
- 2 tbsp sprinkles or decorative toppings (optional)
Instructions
- Crumble the cooled red velvet cake into fine crumbs in a large bowl.
- Add the cream cheese frosting and mix until the mixture is moist and holds together when pressed.
- Roll the mixture into 1-inch balls and place them on a parchment-lined baking sheet.
- Refrigerate the cake balls for 30 minutes until firm.
- Melt a small amount of the white chocolate coating. Dip the tip of each cake pop stick into the coating and insert halfway into each cake ball.
- Chill again for 10 minutes to secure the sticks.
- Melt the remaining coating (stir in oil if needed for smoothness). Dip each cake pop, turning to coat completely.
- Gently tap off excess coating and decorate with sprinkles if desired.
- Place upright in a stand or foam block and let set completely before serving.
Notes
- Make sure the cake is completely cool before mixing to avoid a greasy texture.
- If the mixture feels too soft, chill it before rolling.
- Let coating cool slightly before dipping to prevent cracking.
- Store finished cake pops in an airtight container in the refrigerator for up to 7 days.
- Cake balls can be frozen (undipped) for up to 2 months.
Nutrition
- Serving Size: 1 cake pop
- Calories: 165 kcal
- Sugar: 16 g
- Sodium: 85 mg
- Fat: 8 g
- Saturated Fat: 4.5 g
- Unsaturated Fat: 3 g
- Trans Fat: 0 g
- Carbohydrates: 22 g
- Fiber: 0.5 g
- Protein: 2 g
- Cholesterol: 18 mg