Stained Glass Rock Candy is a nostalgic, old-fashioned candy that instantly brings color, crunch, and sweetness to any celebration. Known for its jewel-like appearance and satisfying snap, this classic sugar candy has been passed down through generations and remains a favorite during holidays, parties, and homemade gift-giving. With simple pantry ingredients and endless flavor options, Stained Glass Rock Candy is as fun to make as it is to eat, making it a timeless confection worth mastering at home.
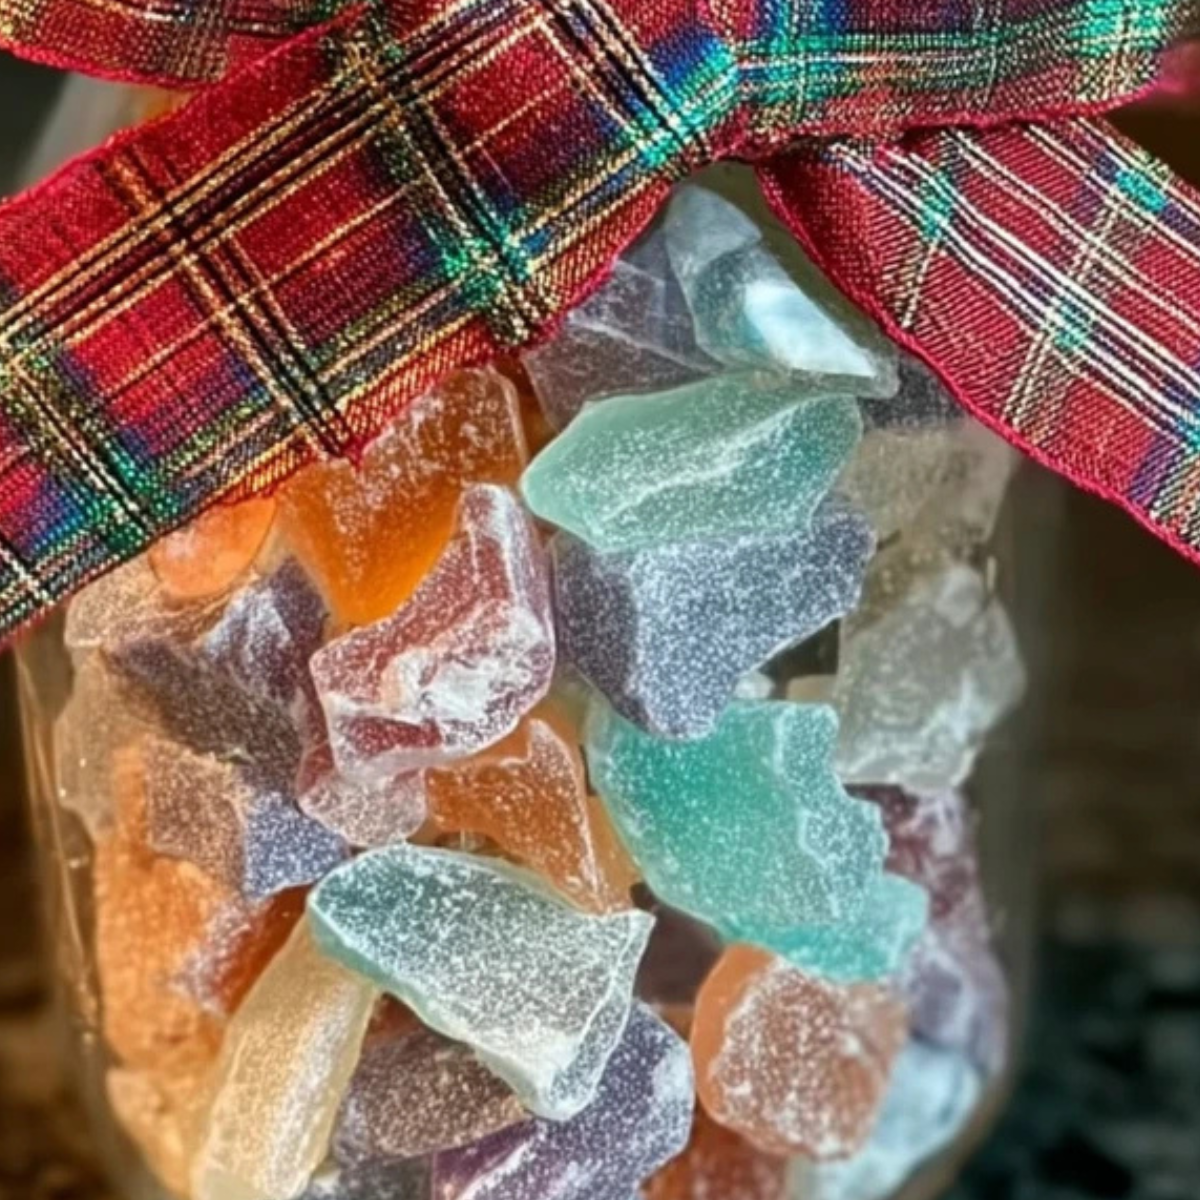
Table of Contents
Why Stained Glass Rock Candy Is a Timeless Favorite
What makes Stained Glass Rock Candy so special is its brilliant appearance and long-lasting shelf life. The candy hardens into clear, colorful shards that resemble stained glass, creating an eye-catching presentation in bowls, jars, or gift bags. This traditional hard candy is naturally gluten-free, budget-friendly, and ideal for making in large batches. Because it stores well for months, Stained Glass Rock Candy is perfect for holiday baking, craft fairs, or edible gifts prepared well in advance.
Essential Ingredients for Stained Glass Rock Candy
• Granulated Sugar: Forms the structure of the candy and creates the hard crack texture
• Corn Syrup: Prevents crystallization and ensures a smooth, glass-like finish
• Water: Helps dissolve the sugar evenly during cooking
• Flavoring Oils or Extracts: Adds concentrated flavor to each colorful batch
• Gel Food Coloring: Creates vibrant, jewel-toned candy without thinning the syrup
• Powdered Sugar: Coats the finished pieces to prevent sticking and clumping
Alternative Ingredient and Flavor Options
If flavoring oils are unavailable, extracts work well when used in slightly larger amounts. Cinnamon, peppermint, spearmint, fruit flavors, and wintergreen are especially popular for Stained Glass Rock Candy. Natural food dyes can be used for softer colors, while clear batches without coloring offer a traditional look. For a festive twist, mix multiple flavors and colors in one batch for a true stained glass effect.
Step-by-Step Instructions for Stained Glass Rock Candy
- Prepare a baking sheet by lining it with foil and generously dusting it with powdered sugar. Create shallow “S”-shaped wells in the sugar to guide the candy as it sets. Prepare multiple pans if making several colors or flavors.
- In a large, heavy-bottomed saucepan, combine granulated sugar, corn syrup, and water. Heat over medium-high heat, stirring constantly until the sugar fully dissolves and the mixture becomes clear.
- Insert a candy thermometer and allow the mixture to boil without stirring. Continue cooking until it reaches the hard crack stage at 300°F (150°C). Reaching this temperature is essential for achieving the proper snap and preventing stickiness.
- Once the target temperature is reached, remove the pan from heat and allow the bubbling to subside slightly. This brief rest helps prevent scorching when flavors are added.
- Carefully divide the hot syrup into heat-safe containers if making multiple colors or flavors. Add food coloring and flavoring to each portion, stirring gently and cautiously as the mixture is extremely hot.
- Drizzle the flavored syrup into the powdered sugar wells, working quickly before the candy begins to set. Control the pour to create thin ribbons or thicker pieces based on preference.
- Allow the Stained Glass Rock Candy to cool and harden completely, about one hour. Once fully set, lift the candy from the powdered sugar.
- Use kitchen scissors or gentle pressure to break the candy into bite-sized shards. Dust generously with additional powdered sugar to prevent sticking.
Expert Tips for Perfect Stained Glass Rock Candy
Always use a reliable candy thermometer when making Stained Glass Rock Candy, as temperature accuracy determines the final texture. Avoid stirring after boiling begins, which can introduce unwanted crystals. Work efficiently when adding colors and flavors, and never rush the cooling process. A final dusting of powdered sugar ensures clean, separate pieces that store beautifully.
Serving Ideas, Variations, and Storage Tips
Stained Glass Rock Candy makes a stunning addition to dessert tables, candy buffets, and holiday cookie trays. Serve it in clear glass jars to highlight the colors or package it as edible gifts with decorative ribbons. For variation, pour the candy onto a silicone mat and break it into rustic shards once cooled. Store Stained Glass Rock Candy in airtight containers at room temperature, away from humidity. Properly stored, it stays fresh and crisp for several months without refrigeration.
The Tradition and Charm Behind Stained Glass Rock Candy
This classic confection has long been associated with family traditions and festive gatherings. Stained Glass Rock Candy was often made in large batches during holidays, with each color representing a different flavor surprise. Its simplicity, durability, and visual appeal have allowed it to remain popular across generations. Making Stained Glass Rock Candy today continues that tradition, blending old-fashioned technique with modern creativity.
Conclusion
Stained Glass Rock Candy is a beautiful blend of tradition, creativity, and simple ingredients that delivers impressive results every time. Its crisp texture, vibrant colors, and long shelf life make it an ideal homemade candy for holidays, special occasions, and edible gifts. By carefully reaching the hard crack stage and working with quality flavorings, you can create clear, jewel-like candy that looks as good as it tastes. Whether you keep it classic or experiment with bold flavors and colors, Stained Glass Rock Candy is a rewarding recipe that never goes out of style.
Frequently Asked Questions About Stained Glass Rock Candy
Why did my Stained Glass Rock Candy turn sticky?
Sticky Stained Glass Rock Candy usually means the sugar mixture did not reach the hard crack stage of 300°F (150°C). If the temperature is too low, the candy retains moisture and becomes tacky. Using a reliable candy thermometer and avoiding humidity during cooling are key to achieving the proper texture.
Can I make Stained Glass Rock Candy without a candy thermometer?
While it is possible to test sugar stages using cold water methods, Stained Glass Rock Candy requires precise temperature control. A candy thermometer is strongly recommended to ensure the mixture reaches the hard crack stage, which gives the candy its signature snap and clarity.
How long does Stained Glass Rock Candy last?
When stored in an airtight container at room temperature, Stained Glass Rock Candy can last for several months. Always coat the pieces generously with powdered sugar before storing to prevent sticking, and keep the container away from moisture or heat.
What are the best flavors for Stained Glass Rock Candy?
Popular flavors for Stained Glass Rock Candy include peppermint, cinnamon, wintergreen, cherry, lemon, orange, and various fruit flavors. Flavoring oils provide the strongest taste, but extracts work well when used in slightly larger amounts. Mixing multiple flavors and colors adds to the classic stained glass appearance.
More Relevant Recipes
- Glazed Lemon Cookies – Easy & Zesty Citrus Treats
- No Cook Divinity Candy – Easy & Foolproof Recipe
- Blueberry Crumble Cheesecake Recipe – Easy & Creamy
Stained Glass Rock Candy
- Prep Time: 15 minutes
- Cook Time: 25 minutes
- Total Time: 1 hour 40 minutes
- Yield: About 3 pounds 1x
- Category: Candy
- Method: Stovetop
- Cuisine: American
- Diet: Gluten Free
Description
Stained Glass Rock Candy is a classic old-fashioned hard candy made with sugar, corn syrup, and flavorings, cooked to the hard crack stage and broken into colorful, jewel-like shards. It is perfect for holidays, candy jars, and homemade edible gifts.
Ingredients
- 4 cups granulated sugar
- 1 1/2 cups light corn syrup
- 1 cup water
- 2 teaspoons flavored oil or 4 teaspoons flavored extract
- 1 teaspoon gel food coloring
- 1 1/2 cups powdered sugar (for coating)
Instructions
- Line a baking sheet with foil and spread the powdered sugar evenly over the surface, forming shallow wells to guide the candy.
- In a large heavy-bottomed saucepan, combine the granulated sugar, corn syrup, and water. Heat over medium-high heat, stirring constantly until the sugar dissolves.
- Insert a candy thermometer and allow the mixture to boil without stirring until it reaches the hard crack stage at 300°F (150°C).
- Remove the saucepan from heat and let the bubbling subside slightly.
- If making multiple flavors or colors, carefully divide the hot syrup into heat-safe containers.
- Add flavoring and food coloring to each portion, stirring gently.
- Drizzle the syrup into the powdered sugar wells and allow it to cool and harden for about 1 hour.
- Once hardened, break or cut the candy into small shards and coat with additional powdered sugar before storing.
Notes
- Always use a candy thermometer to ensure the mixture reaches the hard crack stage.
- Do not stir the sugar mixture after it begins boiling.
- Coating the candy with powdered sugar prevents sticking during storage.
- Store in an airtight container at room temperature away from humidity.
Nutrition
- Serving Size: 1 piece
- Calories: 96 kcal
- Sugar: 25 g
- Sodium: 7 mg
- Fat: 1 g
- Saturated Fat: 0 g
- Unsaturated Fat: 1 g
- Trans Fat: 0 g
- Carbohydrates: 25 g
- Fiber: 0 g
- Protein: 0 g
- Cholesterol: 0 mg