There’s nothing quite as satisfying as a rich, indulgent Buster Bar Ice Cream Cake layered with creamy ice cream, crunchy peanuts, and silky chocolate fudge. This no-bake dessert delivers everything you love about classic ice cream treats in one impressive cake. Perfect for birthdays, summer gatherings, or anytime you crave a frozen dessert, this Buster Bar Ice Cream Cake is easy to assemble, requires minimal ingredients, and guarantees crowd-pleasing results.
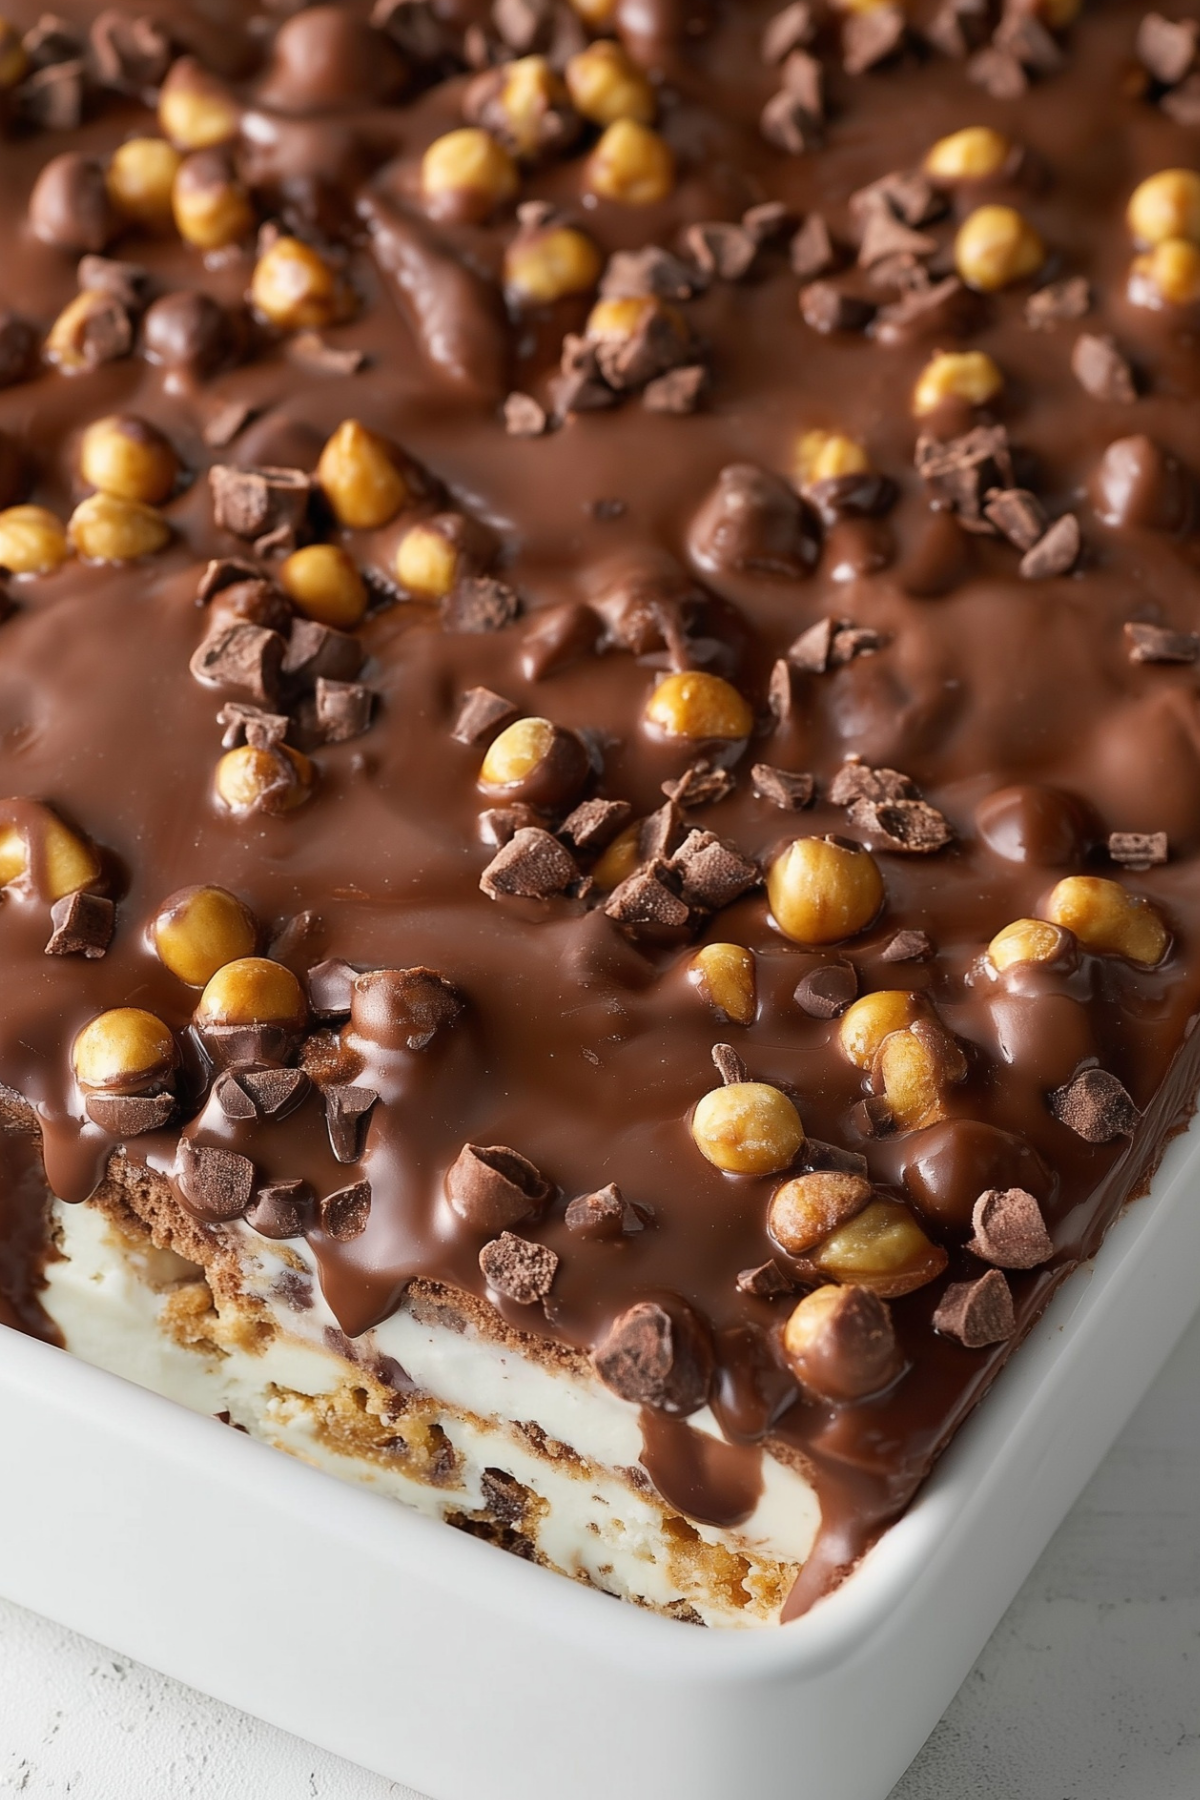
Table of Contents
Why This Buster Bar Ice Cream Cake Is Irresistible
The beauty of a Buster Bar Ice Cream Cake lies in its balance of textures and flavors. You get smooth vanilla ice cream, a crunchy cookie crust, roasted peanuts for a salty bite, and a rich fudge layer that ties everything together.
This frozen dessert is also incredibly convenient. Since it’s a no-bake recipe, there’s no need to turn on the oven. It’s ideal for warm weather and busy schedules. Plus, it can be made ahead of time, making it perfect for entertaining.
Another reason to love this Buster Bar Ice Cream Cake is its versatility. You can customize flavors, toppings, and layers to suit your preferences, making it a go-to dessert for any occasion.
Ingredients for Buster Bar Ice Cream Cake
• Chocolate sandwich cookies: Provide the crunchy base and classic dessert flavor
• Melted butter: Helps bind the crust together for structure
• Vanilla ice cream: The creamy foundation of the cake
• Hot fudge sauce: Adds richness and a smooth chocolate layer
• Salted peanuts: Bring crunch and a salty contrast to the sweetness
• Whipped topping: Creates a light, airy finish
• Chocolate chips: Melted for a smooth topping layer
• Coconut oil: Helps the chocolate topping set smoothly
Alternative Ingredient Suggestions
If you want to adjust your Buster Bar Ice Cream Cake, there are several easy substitutions.
You can swap vanilla ice cream for chocolate, peanut butter, or caramel ice cream for a different flavor profile. For a gluten-free version, use gluten-free sandwich cookies. If peanuts aren’t your preference, try almonds, pecans, or even crushed pretzels for a similar crunch.
For a lighter version of this Buster Bar Ice Cream Cake, consider using low-fat ice cream or a whipped topping alternative. Dairy-free ice cream also works well for those with dietary restrictions.
Step-by-Step Instructions for Buster Bar Ice Cream Cake
- Begin by crushing the chocolate sandwich cookies into fine crumbs. Mix them with melted butter until the texture resembles wet sand. Press the mixture firmly into the bottom of a springform pan to create a solid crust. Freeze the crust for about 15 minutes to set.
- Remove the vanilla ice cream from the freezer and let it soften slightly. Spread a thick, even layer over the chilled crust. Smooth the surface with a spatula and return the pan to the freezer until firm.
- Once the ice cream layer is set, pour a generous layer of hot fudge sauce over the top. Spread evenly, making sure it reaches the edges. Sprinkle a layer of salted peanuts over the fudge for added texture.
- Add another layer of softened ice cream on top of the peanuts. Smooth it carefully to avoid disturbing the layers beneath. Freeze again until completely firm.
- Spread whipped topping over the frozen cake, creating a smooth and even finish. Place the cake back in the freezer while you prepare the chocolate topping.
- Melt chocolate chips with coconut oil until smooth. Allow the mixture to cool slightly, then pour it over the whipped topping. Spread quickly as it will begin to set.
- Freeze the Buster Bar Ice Cream Cake for at least 4 hours, or until fully set. Before serving, let it sit at room temperature for a few minutes to make slicing easier.
Tips & Tricks for the Perfect Buster Bar Ice Cream Cake
To get the best results from your Buster Bar Ice Cream Cake, keep your layers well-frozen between steps. This prevents mixing and ensures clean, defined layers.
When spreading ice cream, use an offset spatula dipped in warm water for a smoother finish. This makes layering much easier and more professional-looking.
Avoid using overly soft ice cream, as it can become runny and affect the structure of your cake. Slightly softened is ideal.
For clean slices, use a sharp knife dipped in hot water and wiped dry between cuts. This technique helps maintain the beautiful layers of your Buster Bar Ice Cream Cake.
Store leftovers tightly covered in the freezer. The cake will stay fresh and delicious for up to a week.
Pairing Ideas and Variations for Buster Bar Ice Cream Cake
A Buster Bar Ice Cream Cake pairs beautifully with simple beverages like iced coffee, milk, or even a rich hot chocolate for contrast. For special occasions, serve it alongside fresh berries to balance the richness.
You can also experiment with different variations. Try adding a caramel drizzle between layers for a caramel Buster Bar twist. Swap the cookie crust for a brownie base to create a more decadent dessert.
For a crunchy upgrade, add layers of crushed candy bars or toffee bits. A peanut butter swirl in the ice cream layer also enhances the flavor and complements the peanuts.
This Buster Bar Ice Cream Cake can be made ahead of time, making it ideal for parties. Simply prepare it a day in advance and keep it frozen until ready to serve.
Storage and Make-Ahead Tips
One of the biggest advantages of a Buster Bar Ice Cream Cake is how well it stores. Keep it tightly wrapped in plastic wrap or an airtight container to prevent freezer burn.
If you’re planning for an event, make the cake up to two days in advance. This allows the layers to fully set and develop flavor.
When serving, let the cake sit at room temperature for about 5–10 minutes. This ensures the texture is creamy and easy to slice without melting too quickly.
Why You’ll Love This Buster Bar Ice Cream Cake Again and Again
This Buster Bar Ice Cream Cake is more than just a dessert—it’s a reliable, crowd-pleasing treat that combines simplicity with indulgence. Its no-bake nature, customizable layers, and rich flavor make it a staple recipe for any dessert lover.
Whether you’re making it for a celebration or simply to satisfy a sweet craving, this Buster Bar Ice Cream Cake delivers every time with its perfect combination of creamy, crunchy, and chocolatey goodness.
Conclusion: A Must-Try Buster Bar Ice Cream Cake
If you’re searching for a dessert that’s both effortless and unforgettable, this Buster Bar Ice Cream Cake checks every box. With its luscious layers of creamy ice cream, crunchy peanuts, and rich chocolate fudge, it delivers a perfect balance of textures and flavors in every bite.
What makes this Buster Bar Ice Cream Cake truly special is its simplicity. There’s no baking required, minimal prep time, and endless opportunities for customization. Whether you stick to the classic version or experiment with new flavors and toppings, this dessert remains a reliable favorite for any occasion.
From summer parties to birthday celebrations, this Buster Bar Ice Cream Cake is guaranteed to impress your guests and satisfy every sweet craving. Once you try it, it’s bound to become a regular addition to your dessert rotation.
FAQs About Buster Bar Ice Cream Cake
What is a Buster Bar Ice Cream Cake made of?
A Buster Bar Ice Cream Cake typically consists of a cookie crust, layers of vanilla or chocolate ice cream, hot fudge sauce, salted peanuts, whipped topping, and a chocolate shell topping. These layers create a rich, creamy, and crunchy dessert that’s both indulgent and refreshing.
How long should I freeze a Buster Bar Ice Cream Cake before serving?
For best results, freeze your Buster Bar Ice Cream Cake for at least 4 hours, though overnight freezing is ideal. This ensures all layers are fully set and easy to slice without losing structure.
Can I make Buster Bar Ice Cream Cake ahead of time?
Yes, a Buster Bar Ice Cream Cake is perfect for making ahead. You can prepare it up to 2 days in advance and store it in the freezer. Just keep it well covered to maintain freshness and prevent freezer burn.
More Relevant Recipes
Print
Buster Bar Ice Cream Cake
- Prep Time: 25 minutes
- Cook Time: 0 minutes
- Total Time: 5 hours
- Yield: 12 servings 1x
- Category: Dessert
- Method: No-Bake
- Cuisine: American
Description
Buster Bar Ice Cream Cake is a rich, no-bake frozen dessert made with layers of chocolate cookie crust, creamy vanilla ice cream, hot fudge, crunchy peanuts, whipped topping, and a chocolate shell. It’s an easy, crowd-pleasing treat perfect for parties, birthdays, and summer gatherings.
Ingredients
- 24 chocolate sandwich cookies (about 2 cups crushed) – forms the crunchy base
- 6 tablespoons unsalted butter, melted – binds the crust
- 1.5 quarts (about 6 cups) vanilla ice cream, softened – creamy main layer
- 1 1/2 cups hot fudge sauce – rich chocolate layer
- 1 cup salted peanuts – adds crunch and salty balance
- 2 cups whipped topping (such as Cool Whip) – light and airy topping
- 1 cup semi-sweet chocolate chips – used for chocolate shell
- 2 tablespoons coconut oil – smooths and sets the chocolate topping
Instructions
- Crush the chocolate sandwich cookies into fine crumbs. Mix with melted butter until fully combined. Press the mixture firmly into the bottom of a 9-inch springform pan. Freeze for 15 minutes to set.
- Spread half of the softened vanilla ice cream evenly over the crust. Smooth the surface and freeze for 30–45 minutes until firm.
- Pour the hot fudge sauce over the ice cream layer and spread evenly. Sprinkle salted peanuts over the fudge layer. Freeze again for 20–30 minutes.
- Add the remaining vanilla ice cream on top, smoothing carefully. Freeze until fully firm, about 1 hour.
- Spread whipped topping evenly over the top layer. Return to freezer while preparing the chocolate topping.
- Melt chocolate chips with coconut oil in a microwave-safe bowl in 30-second intervals, stirring until smooth. Let cool slightly.
- Pour the melted chocolate over the whipped topping and spread quickly into an even layer.
- Freeze the cake for at least 4 hours or overnight until completely set. Let sit at room temperature for 5–10 minutes before slicing and serving.
Notes
- Ensure each layer is fully frozen before adding the next to maintain clean layers.
- Use slightly softened ice cream for easier spreading, but avoid letting it melt.
- Dip a knife in hot water for clean slices.
- Store tightly covered in the freezer for up to 1 week.
- Substitute peanuts with almonds or pecans if desired.
- Use gluten-free cookies for a gluten-free version.
Nutrition
- Serving Size: 1 slice
- Calories: 420
- Sugar: 32g
- Sodium: 260mg
- Fat: 26g
- Saturated Fat: 14g
- Unsaturated Fat: 10g
- Trans Fat: 0.5g
- Carbohydrates: 42g
- Fiber: 2g
- Protein: 6g
- Cholesterol: 55mg