Halloween is the perfect time to get creative with your desserts, and these Mummy Brownies are just the treat you need to bring some spooky fun to your kitchen. Easy to make, delightfully delicious, and incredibly cute, these brownies are guaranteed to be a hit with kids and adults alike. With their rich chocolatey base and fun white chocolate “mummy wraps,” these treats are both festive and indulgent. Whether you’re preparing for a Halloween party or just want to surprise your family with a fun, themed dessert, these Mummy Brownies are sure to impress.

Table of Contents
Why Mummy Brownies Are the Perfect Halloween Treat
These Mummy Brownies are not only a visual treat but also offer a perfect balance of flavors. The brownies are made with high-quality semisweet chocolate chips, ensuring a rich and fudgy texture. The addition of white chocolate creates a fun and spooky “mummy” effect that adds both sweetness and a playful twist. Easy to make and simple to decorate, these brownies are a great project for baking with kids, allowing them to get involved in the spooky fun. The combination of a soft brownie base with crunchy white chocolate “bandages” is sure to make everyone smile.
Ingredients for Mummy Brownies
Here are the ingredients you’ll need to create these spooky Mummy Brownies. Each ingredient plays a crucial role in achieving the perfect texture and flavor:
• Butter: Adds richness and moisture to the brownie base
• Semisweet Chocolate Chips: The star of the brownies, giving them that decadent chocolate flavor
• Eggs: Provide structure and help bind the ingredients together
• Sugar (White and Brown): Sweetens the brownies while contributing to their moistness
• Flour: The base for the brownie batter, providing structure
• Cocoa Powder: Adds a deep chocolate flavor
• Vanilla Extract: Enhances the flavor profile of the brownies
• Salt: Balances the sweetness and enhances flavor
• White Chocolate Chips or Candy Wafers: Used for creating the mummy wraps
• Candy Eyeballs: The fun and spooky finishing touch
Alternative Ingredient Suggestions for Mummy Brownies
If you’re looking to switch things up or need alternatives, here are a few suggestions:
• Milk Chocolate Chips instead of semisweet chocolate for a sweeter, creamier taste
• Dark Chocolate Chips for a richer, more intense chocolate flavor
• Vegetable Oil can replace the butter if you need a dairy-free option
• Gluten-Free Flour for those with dietary restrictions
• Candy Eyes can be replaced with white chocolate chips if you want a simpler look
Step-by-Step Instructions for Mummy Brownies
Follow these easy steps to make your own spooky Mummy Brownies:
- Preheat your oven to 350°F (175°C). Line a 9×9-inch baking pan with parchment paper to ensure the brownies come out easily after baking.
- In a microwave-safe bowl, melt the butter and semisweet chocolate chips together in 30-second intervals. Stir between each session until fully melted and smooth.
- In a separate bowl, combine the dry ingredients: flour, sugar, brown sugar, cocoa powder, and salt. Mix thoroughly.
- Add the eggs and vanilla extract to the melted chocolate mixture. Stir until everything is well combined.
- Gradually add the dry ingredients to the wet mixture and stir until fully incorporated. Be careful not to overmix.
- Pour the brownie batter into the prepared baking pan and spread it evenly.
- Bake for 30 to 35 minutes, or until a toothpick inserted into the center comes out clean.
- Allow the brownies to cool for at least 30 minutes before cutting them into 16 squares (4 rows by 4).
- While the brownies cool, melt the white chocolate in a microwave-safe bowl in 30-second intervals, stirring between each. Once smooth, transfer it to a sandwich bag and snip a small corner.
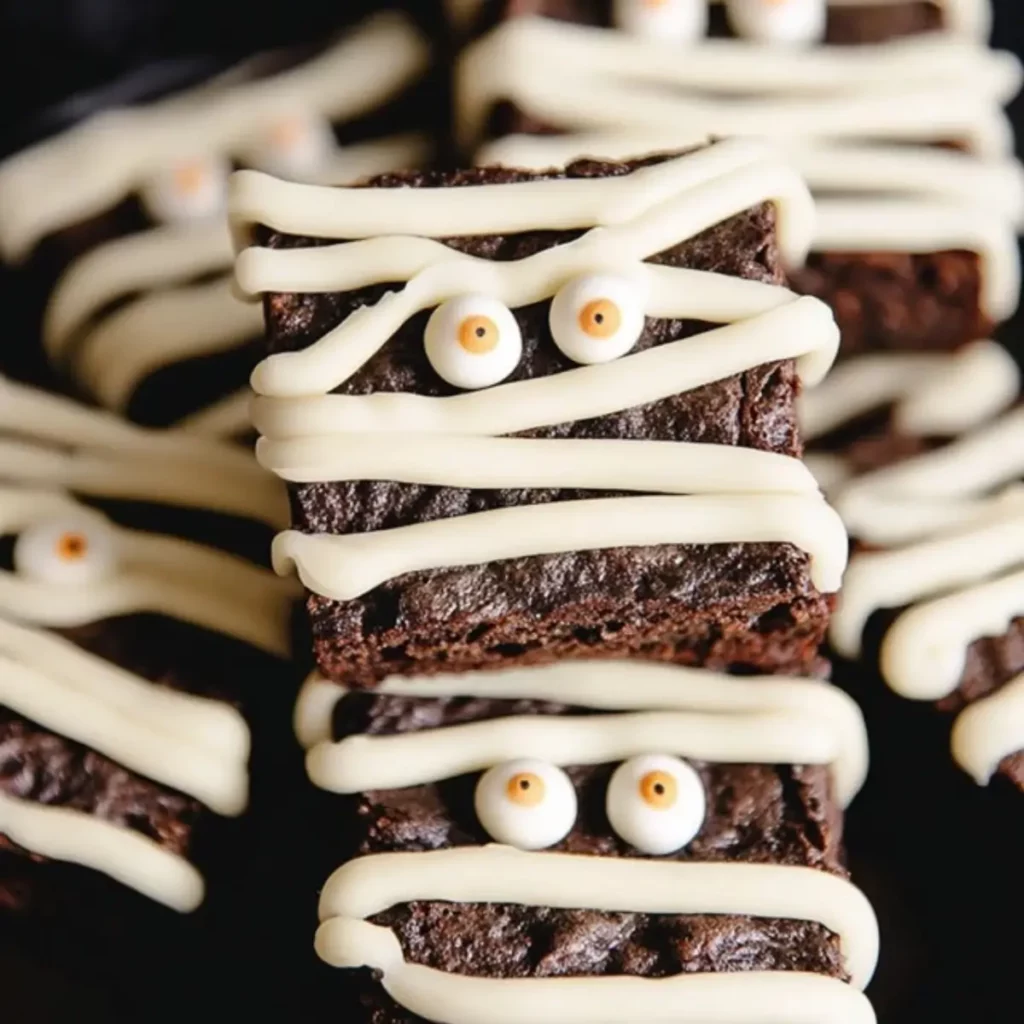
- Place two candy eyeballs on each brownie. Using the white chocolate, drizzle “bandages” across each brownie to create the mummy effect. Ensure the chocolate touches the eyeballs to keep them in place.
- Let the chocolate set for 10 to 15 minutes before serving or storing.
Tips & Tricks for Perfect Mummy Brownies
• Avoid Overbaking: Test your brownies with a toothpick to avoid overbaking, which can result in dry brownies. Remember, the brownies will continue to set as they cool.
• White Chocolate Consistency: If your white chocolate is too thick to drizzle smoothly, add a teaspoon of vegetable oil to thin it out.
• Store Properly: Store any leftover Mummy Brownies in an airtight container at room temperature for up to 1 week. You can also freeze them for up to 3 months.
Pairing Ideas and Variations for Mummy Brownies
Looking for a way to make your Mummy Brownies even more fun? Here are some pairing ideas:
• Serve with Ice Cream: A scoop of vanilla or pumpkin spice ice cream makes the perfect complement to these rich, fudgy brownies.
• Add a Spicy Twist: Try adding a pinch of cinnamon or cayenne pepper to the brownie batter for a Halloween-inspired spicy kick.
• Decorate with Halloween Sprinkles: Add colorful sprinkles to the top of the white chocolate for extra flair.
Health Benefits of Mummy Brownies (Optional)
While Mummy Brownies are indulgent, they can also be made healthier with small swaps. For instance, using almond flour or coconut flour can create a lower-carb version, and swapping butter for coconut oil can offer a dairy-free alternative. Of course, enjoy these treats in moderation, as they are a special dessert perfect for celebrating Halloween.
Mummy Brownies are a delightful treat for any Halloween celebration. Whether you’re hosting a spooky party or simply indulging in some festive fun at home, these brownies are sure to become a favorite. With their gooey, chocolatey base and cute white chocolate bandages, they are as delicious as they are adorable!
Conclusion
Mummy Brownies are a perfect way to celebrate Halloween with a spooky yet delicious treat. These brownies not only look adorable but also pack in rich, fudgy chocolate flavor, making them a hit for kids and adults alike. With their simple ingredients and easy-to-follow steps, this recipe offers a fun and festive baking experience for the whole family. Whether you’re preparing for a Halloween party or simply indulging in a sweet treat, these Mummy Brownies are sure to be a crowd-pleaser. So, grab your ingredients, get creative with the mummy wraps, and enjoy this spook-tacular dessert!
FAQ
Can I use dark chocolate instead of semisweet chocolate in Mummy Brownies?
Yes, you can substitute dark chocolate for semisweet chocolate to create a richer, more intense flavor. Dark chocolate has a higher cocoa content, so it will result in a slightly less sweet but more decadent brownie.
How can I make Mummy Brownies without white chocolate?
If you don’t have white chocolate, you can use melted candy melts or even a thick cream cheese frosting to create the mummy wraps. For the candy eyes, you can also use mini marshmallows or chocolate chips.
Can I make Mummy Brownies ahead of time?
Absolutely! Mummy Brownies can be made a day or two ahead of time. Simply store them in an airtight container at room temperature, or freeze them for up to 3 months. Just make sure to let the white chocolate set before storing.
More Relevant Recipes
- Halloween Chocolate Chip Cookies: These fun and festive cookies are perfect for Halloween parties. With classic chocolate chips and a spooky twist, they’re a great treat to pair with Mummy Brownies for a spooky dessert spread.
- Melted Jack-O-Lantern Brownies: Similar in texture and flavor to Mummy Brownies, these Halloween-themed brownies are topped with a jack-o-lantern design that adds extra fun to your spooky dessert lineup.
- Vampire Bite Halloween Cupcakes: These vampire bite cupcakes are a sweet and spooky way to celebrate Halloween. With a rich chocolate base and a bite-sized twist, they pair perfectly with the Mummy Brownies for a fang-tastic dessert display.

Mummy Brownies:
- Prep Time: 15 minutes
- Cook Time: 30-35 minutes
- Total Time: 1 hour
- Yield: 16 brownies 1x
- Category: Dessert
- Method: Baking
- Cuisine: American
- Diet: Vegetarian
Description
These Mummy Brownies are a perfect Halloween treat that combine rich, fudgy brownies with spooky white chocolate wraps and candy eyeballs. Easy to make and fun to decorate, they bring both flavor and creativity to your dessert table. Whether you’re hosting a Halloween party or just indulging in festive fun, these brownies will be a hit with kids and adults alike.
Ingredients
- ½ Cup Butter
- ¼ Cup Semisweet Chocolate Chips
- 2 teaspoons Vanilla Extract
- 2 large Eggs
- ¾ Cup All-Purpose Flour
- ½ Cup Granulated Sugar
- ½ Cup Brown Sugar
- ⅓ Cup Dutch Process Cocoa
- ¼ teaspoon Salt
- 32 Candy Eyeballs
- 1 Cup White Chocolate Chips (or Candy Wafers)
Instructions
- Preheat the oven to 350°F (175°C). Line a 9×9-inch baking pan with parchment paper.
- In a microwave-safe bowl, melt the butter and semisweet chocolate chips together in 30-second intervals, stirring between each until fully smooth.
- In a separate bowl, whisk together flour, granulated sugar, brown sugar, cocoa, and salt.
- Beat the eggs and vanilla extract into the melted butter-chocolate mixture until fully combined.
- Gradually stir in the dry ingredients and mix until combined. Avoid over-mixing.
- Pour the batter into the prepared pan and spread evenly. Bake for 30 to 35 minutes, or until a toothpick inserted into the center comes out clean.
- Let the brownies cool completely for at least 30 minutes before cutting them into 16 squares (4 rows by 4).
- Place two candy eyeballs on each brownie square.
- In a microwave-safe bowl, melt the white chocolate chips in 30-second intervals, stirring in between, until smooth. Pour the melted chocolate into a zip-loc bag.
- Snip a small corner off the zip-loc bag and drizzle the white chocolate over each brownie, creating mummy-like wraps, and ensuring the chocolate touches the candy eyeballs to hold them in place.
- Let the chocolate cool and harden for about 10-15 minutes before serving.
Notes
- Be sure not to overbake the brownies. Check doneness with a toothpick.
- If the white chocolate is too thick to drizzle, add a teaspoon of vegetable oil to thin it out.
- Store leftovers in an airtight container at room temperature for up to 1 week, or freeze for up to 3 months.
- Use milk chocolate chips if you prefer a sweeter taste in your brownies.
- For a dairy-free option, replace butter with coconut oil and use dairy-free white chocolate.
Nutrition
- Serving Size: 1 brownie
- Calories: 150
- Sugar: 15g
- Sodium: 99mg
- Fat: 7g
- Saturated Fat: 4g
- Unsaturated Fat: 2g
- Trans Fat: 1g
- Carbohydrates: 21g
- Fiber: 1g
- Protein: 2g
- Cholesterol: 36mg