St Patrick’s Day Mini Ombre Cakes are the perfect way to celebrate the holiday with something sweet, colorful, and unforgettable. These adorable layered desserts feature beautiful shades of green cake stacked together for a stunning ombre effect that instantly captures the spirit of St. Patrick’s Day. Whether you’re hosting a party, planning a festive family dinner, or simply looking for a fun baking project, St Patrick’s Day Mini Ombre Cakes deliver charm, flavor, and eye-catching presentation in every bite.
Light, fluffy, and topped with creamy frosting, these mini ombre cakes are surprisingly easy to make at home. With simple ingredients and step-by-step layering, you’ll create a dessert that looks bakery-worthy but feels completely homemade.
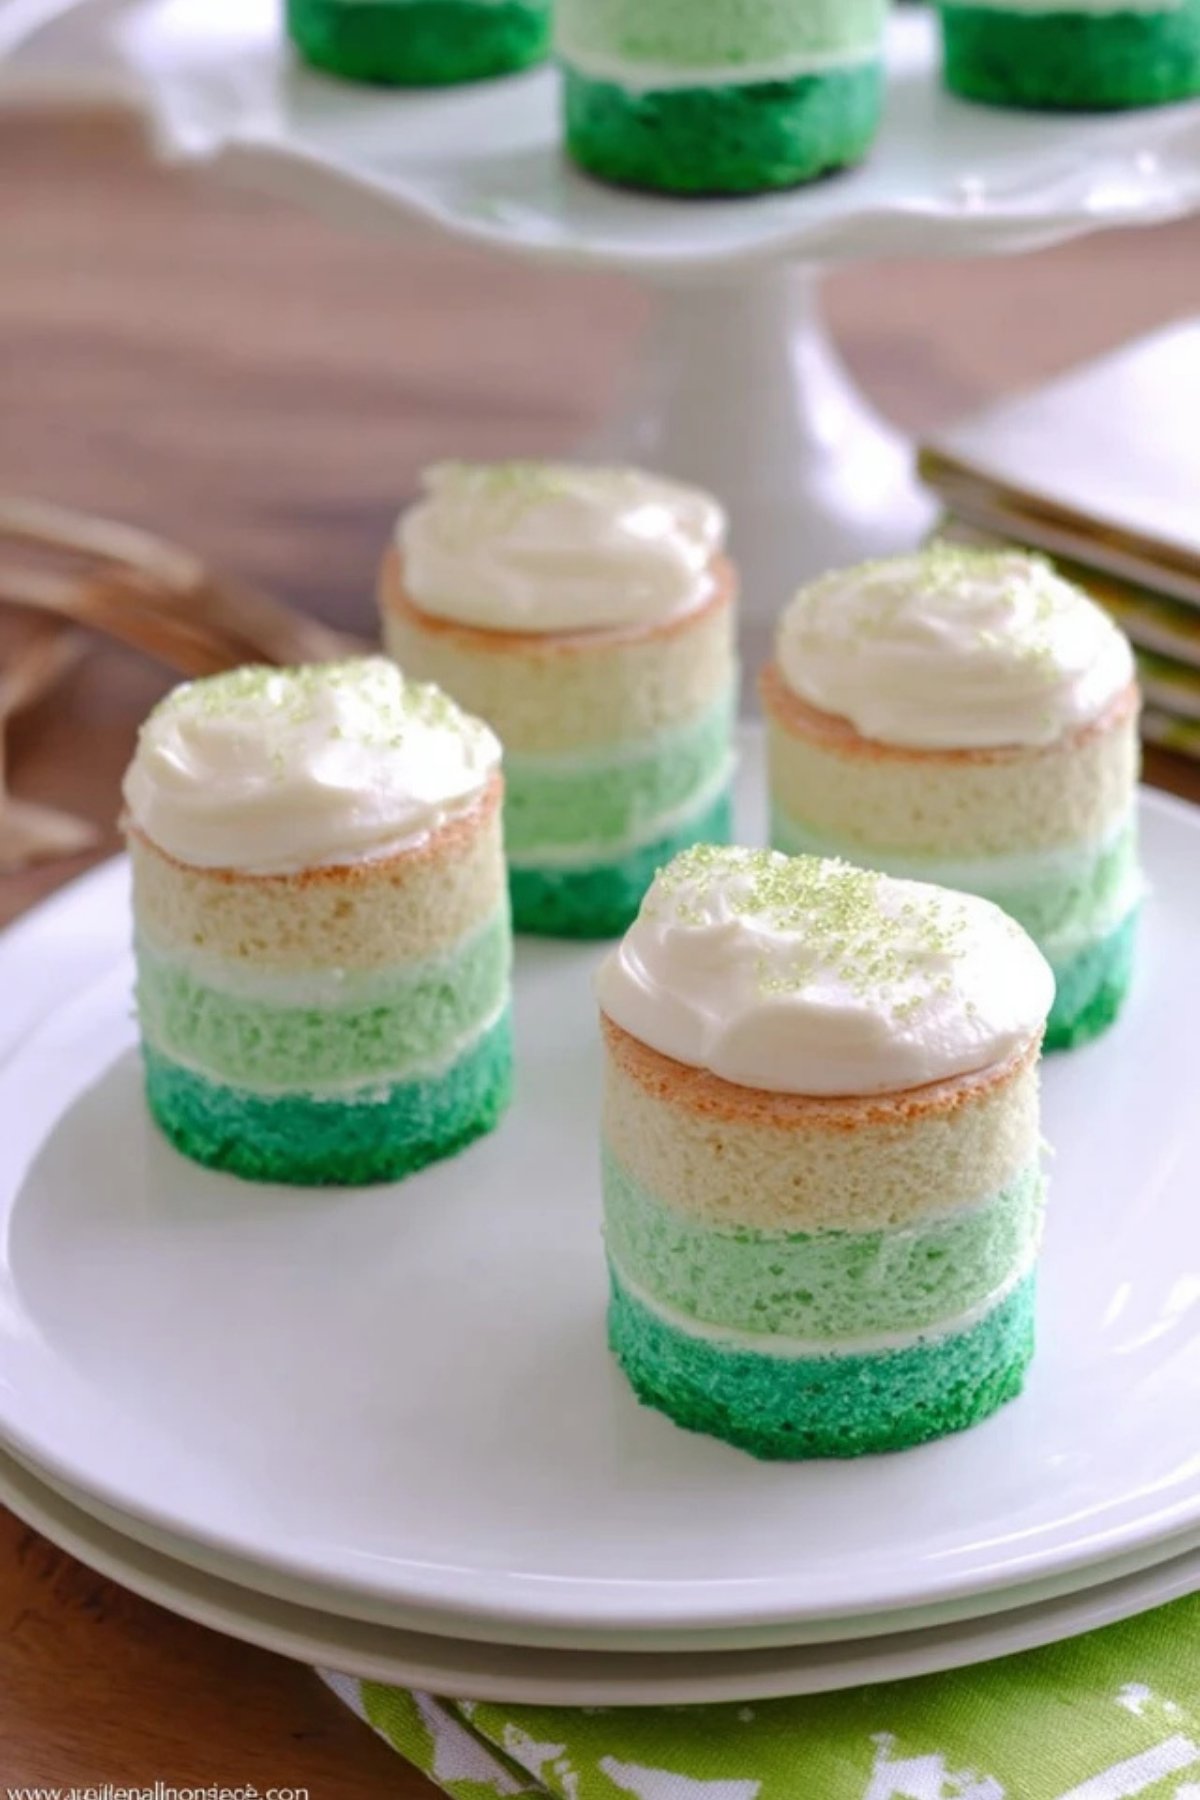
Table of Contents
Why You’ll Love These St Patrick’s Day Mini Ombre Cakes
St Patrick’s Day Mini Ombre Cakes are more than just pretty desserts. They combine festive color, soft texture, and rich vanilla flavor into one perfectly portioned treat.
These mini layer cakes are:
• Visually stunning with their green ombre cake layers
• Perfectly portioned for parties and gatherings
• Moist and fluffy with a tender crumb
• Customizable with different frostings or decorations
• Ideal for St. Patrick’s Day dessert tables
Because they’re individually sized, St Patrick’s Day Mini Ombre Cakes are easy to serve. Guests can grab one without slicing or plating, making them a convenient and mess-free option for celebrations.
Ingredients for St Patrick’s Day Mini Ombre Cakes
Creating St Patrick’s Day Mini Ombre Cakes requires simple pantry staples. Each ingredient plays an important role in flavor, structure, and texture.
• All-purpose flour: Provides structure and creates a soft, tender crumb.
• Baking powder: Helps the cake layers rise evenly and stay fluffy.
• Salt: Enhances sweetness and balances flavors.
• Unsalted butter: Adds richness and moisture to the mini cakes.
• Granulated sugar: Sweetens and contributes to a light texture.
• Eggs: Bind the batter and add stability to the layered cake.
• Vanilla extract: Brings warm, aromatic flavor to the dessert.
• Milk: Keeps the cake moist and smooth.
• Green food coloring: Creates the signature ombre cake layers.
• Powdered sugar: Forms the base of the creamy frosting.
• Heavy cream or milk (for frosting): Adjusts frosting consistency.
Using gel food coloring works especially well for St Patrick’s Day Mini Ombre Cakes because it creates vibrant shades without thinning the batter.
Ingredient Swaps for Different Needs
If you need adjustments, these substitutions work beautifully while maintaining the charm of your St Patrick’s Day Mini Ombre Cakes:
• Gluten-free flour blend: Replace all-purpose flour for a gluten-free version.
• Plant-based butter and milk: Use dairy-free alternatives for a vegan-friendly option.
• Almond extract: Swap for vanilla to create a subtle nutty twist.
• Natural food coloring: Use spinach powder or matcha for a natural green ombre effect.
These swaps allow you to enjoy festive mini ombre cakes while meeting dietary preferences.
Step-by-Step Guide to Making St Patrick’s Day Mini Ombre Cakes
Follow these detailed steps to create bakery-style St Patrick’s Day Mini Ombre Cakes with beautiful layered color.
- Preheat your oven to 350°F and prepare cake pans by greasing and lining them with parchment paper. This prevents sticking and ensures smooth layers.
- In a medium bowl, whisk together flour, baking powder, and salt. Mixing dry ingredients separately helps distribute the leavening evenly.
- In a large bowl, cream the butter and sugar until light and fluffy. This step incorporates air, giving your St Patrick’s Day Mini Ombre Cakes a soft texture.
- Add eggs one at a time, mixing well after each addition. Stir in vanilla extract.
- Alternate adding the dry ingredients and milk into the butter mixture. Begin and end with the dry ingredients. Mix just until combined to avoid overworking the batter.
- Divide the batter evenly into three or four bowls, depending on how many shades you want for your ombre cake layers.
- Add varying amounts of green food coloring to each bowl, creating different shades from light mint to deep emerald. Stir gently until evenly colored.
- Pour each shade into separate prepared pans and smooth the tops with a spatula.
- Bake for 15–20 minutes or until a toothpick inserted into the center comes out clean. Avoid overbaking to keep the mini cakes moist.
- Allow the layers to cool completely before assembling. Warm cake layers can cause frosting to melt.
- Use a round cookie cutter to cut small cake circles from each layer. Stack them from darkest shade at the bottom to lightest at the top to create the ombre effect.
- Prepare frosting by beating butter and powdered sugar together, then adding cream until smooth and spreadable.
- Frost the tops and sides of each stacked cake. Chill briefly to set the frosting and sharpen the layers.
With careful layering, your St Patrick’s Day Mini Ombre Cakes will showcase a stunning gradient interior when sliced.
Tips for Perfect St Patrick’s Day Mini Ombre Cakes
To make your St Patrick’s Day Mini Ombre Cakes truly shine, keep these expert tips in mind:
• Use a kitchen scale to divide batter evenly for consistent layer thickness.
• Apply a crumb coat before final frosting to trap loose crumbs.
• Chill layers before cutting to achieve clean edges.
• Use gel coloring gradually to control shade intensity.
• Avoid overmixing the batter to maintain a soft crumb.
For extra flair, decorate the tops of your St Patrick’s Day Mini Ombre Cakes with festive sprinkles, edible gold dust, or small shamrock decorations.
Store leftover mini ombre cakes in an airtight container in the refrigerator for up to three days. Let them come to room temperature before serving for best flavor and texture.
Serving Ideas and Creative Variations
St Patrick’s Day Mini Ombre Cakes can be customized in many fun ways to match your celebration style.
Serve these mini cakes alongside:
• Irish coffee or hot cocoa
• Vanilla ice cream
• Fresh berries for a colorful contrast
• A drizzle of white chocolate
For flavor variations, try:
• Adding lemon zest to the batter for a citrus twist
• Incorporating cream cheese frosting instead of buttercream
• Filling the layers with whipped cream or chocolate ganache
• Creating a chocolate ombre version with green-tinted frosting
If you’re planning ahead, St Patrick’s Day Mini Ombre Cakes can be baked a day in advance. Wrap the cooled layers tightly in plastic wrap and assemble just before serving to keep them fresh.
The Festive Appeal of St Patrick’s Day Mini Ombre Cakes
St Patrick’s Day Mini Ombre Cakes embody everything joyful about the holiday. The green ombre layers symbolize Irish pride and festive fun, while their petite size makes them ideal for sharing.
Because they combine classic vanilla cake with decorative flair, these mini ombre cakes appeal to both kids and adults. They’re elegant enough for themed parties yet simple enough for home bakers.
The layered presentation makes each bite exciting, revealing soft gradients of green cake beneath creamy frosting. When displayed on a dessert table, St Patrick’s Day Mini Ombre Cakes instantly become a centerpiece.
With their charming appearance and delicious flavor, St Patrick’s Day Mini Ombre Cakes are guaranteed to impress. Whether you’re baking for a festive gathering or simply celebrating at home, these mini ombre cakes bring sweetness, color, and holiday spirit to every occasion.
Frequently Asked Questions About St Patrick’s Day Mini Ombre Cakes
Can I make St Patrick’s Day Mini Ombre Cakes in advance?
Yes, St Patrick’s Day Mini Ombre Cakes can be prepared ahead of time. Bake the cake layers one day in advance and wrap them tightly in plastic wrap once cooled. Store at room temperature or refrigerate if your kitchen is warm. Assemble and frost the mini ombre cakes the day you plan to serve them for the freshest texture and appearance.
How do I get a smooth ombre effect in St Patrick’s Day Mini Ombre Cakes?
To achieve a seamless gradient in your St Patrick’s Day Mini Ombre Cakes, divide the batter evenly into separate bowls. Start with a very small amount of green food coloring for the lightest shade, then gradually increase the amount in each bowl. Mixing thoroughly ensures even color distribution and a clean ombre cake effect once stacked.
What frosting pairs best with St Patrick’s Day Mini Ombre Cakes?
Classic vanilla buttercream is the most popular choice for St Patrick’s Day Mini Ombre Cakes because it complements the soft cake layers without overpowering them. Cream cheese frosting adds a slight tang, while whipped frosting creates a lighter finish. Choose a frosting that spreads easily to keep the mini layer cakes looking neat and polished.
More Relevant Recipes
- Shamrock Pretzels – Easy 4-Ingredient Delight
- Vanilla Mint St Patrick’s Day Cookies – Easy & Festive
- No Bake Baileys Chocolate Pie – Irresistible Treat
St Patrick’s Day Mini Ombre Cakes
- Prep Time: 30 minutes
- Cook Time: 20 minutes
- Total Time: 50 minutes
- Yield: 12 mini cakes 1x
- Category: Dessert
- Method: Baking
- Cuisine: American
- Diet: Vegetarian
Description
St Patrick’s Day Mini Ombre Cakes are festive layered vanilla mini cakes featuring beautiful shades of green for a stunning ombre effect. These soft, fluffy cakes are stacked and frosted with creamy buttercream, making them the perfect individually sized dessert for St. Patrick’s Day parties and celebrations.
Ingredients
- 2 1/2 cups all-purpose flour
- 2 1/2 teaspoons baking powder
- 1/2 teaspoon salt
- 3/4 cup unsalted butter, softened
- 1 3/4 cups granulated sugar
- 4 large eggs, room temperature
- 1 tablespoon pure vanilla extract
- 1 cup whole milk, room temperature
- Green gel food coloring (varied amounts for ombre effect)
- 1 cup unsalted butter, softened (for frosting)
- 3 1/2 cups powdered sugar (for frosting)
- 2–3 tablespoons heavy cream or milk (for frosting consistency)
Instructions
- Preheat oven to 350°F (175°C). Grease and line cake pans with parchment paper.
- In a medium bowl, whisk together flour, baking powder, and salt. Set aside.
- In a large bowl, beat butter and sugar until light and fluffy, about 3–4 minutes.
- Add eggs one at a time, mixing well after each addition. Stir in vanilla extract.
- Alternate adding dry ingredients and milk to the butter mixture, beginning and ending with dry ingredients. Mix just until combined.
- Divide batter evenly into 3–4 bowls. Add increasing amounts of green gel food coloring to create different shades.
- Pour each shade into prepared pans and smooth the tops evenly.
- Bake for 15–20 minutes, or until a toothpick inserted in the center comes out clean. Cool completely.
- Use a round cookie cutter to cut mini cake circles from each layer.
- Stack layers from darkest to lightest shade to create the ombre effect.
- For frosting, beat butter until smooth, then gradually add powdered sugar. Add cream until light and spreadable.
- Apply a crumb coat to each mini cake, chill briefly, then frost smoothly. Decorate as desired and serve.
Notes
- Use gel food coloring for vibrant shades without thinning the batter.
- Chill cake layers before cutting for cleaner edges.
- Do not overmix the batter to keep cakes light and tender.
- Store in an airtight container in the refrigerator for up to 3 days.
- Bring to room temperature before serving for best flavor and texture.
Nutrition
- Serving Size: 1 mini cake
- Calories: 420 kcal
- Sugar: 38 g
- Sodium: 180 mg
- Fat: 22 g
- Saturated Fat: 14 g
- Unsaturated Fat: 6 g
- Trans Fat: 0.5 g
- Carbohydrates: 52 g
- Fiber: 1 g
- Protein: 5 g
- Cholesterol: 95 mg